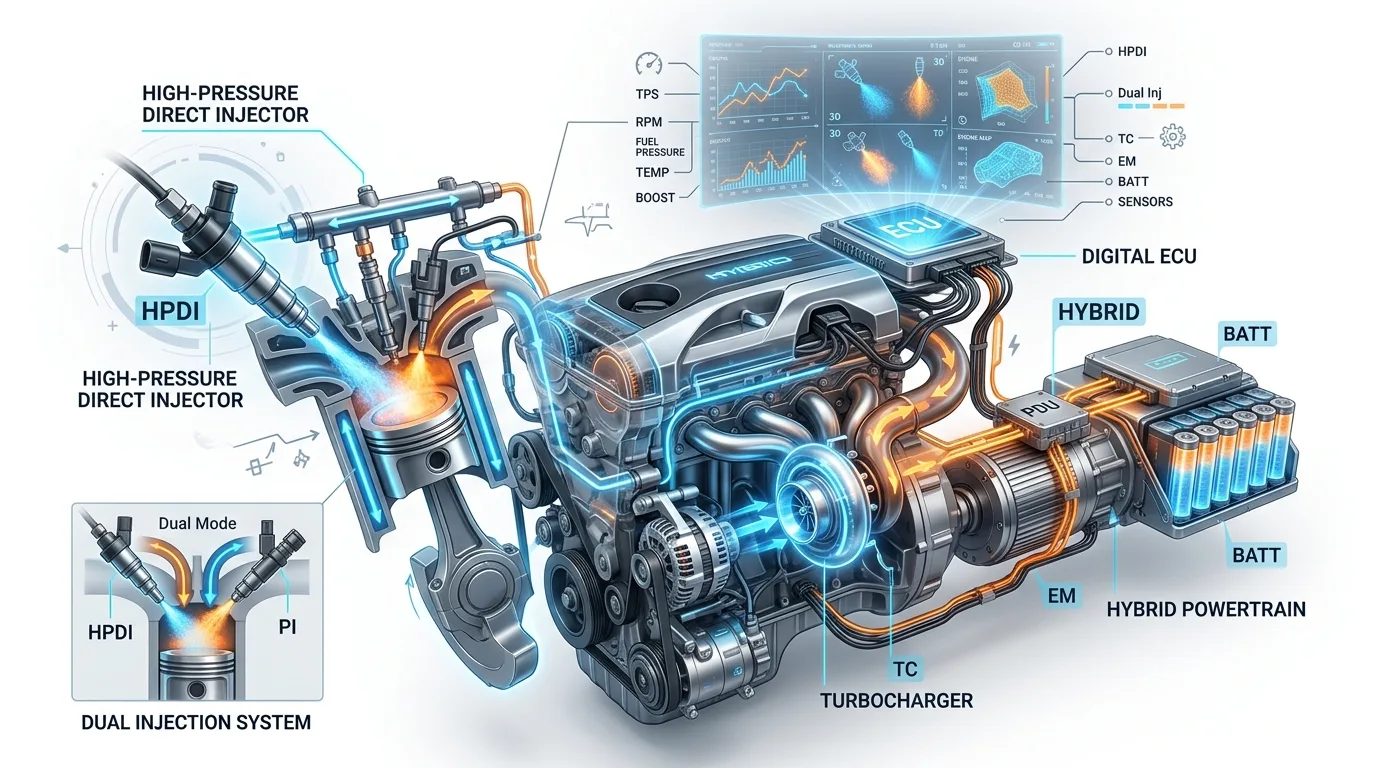
You are offline — AutoTools still works from your device.
Internal combustion engine Technical tutorial

Internal Combustion Engines: How They Work and Why They Matter

An internal combustion engine converts fuel into motion by burning a mixture of fuel and air inside its cylinders, creating high-pressure gases that push the pistons and turn the crankshaft to produce mechanical power. In a typical four-stroke engine, the process consists of four stages: intake, when the air-fuel mixture enters the cylinder; compression, when the piston compresses the mixture; power, when combustion forces the piston downward; and exhaust, when burned gases are expelled. Key com

5 min read Updated Oct 11, 2026 AutoTools
Advertisement

What Is a Combustion Engine?

A combustion engine is a machine that converts the chemical energy in fuel into mechanical energy through controlled burning. The most common type in vehicles is the internal combustion engine, where the burning happens inside a cylinder rather than in a separate furnace. This design makes engines compact and powerful enough to move cars, trucks, and motorcycles.

The basic idea is simple: mix fuel with air, ignite it, and use the expanding gases to push a piston. That linear motion is then turned into rotation by a crankshaft, which ultimately drives the wheels. Despite advances in electric vehicles, combustion engines remain dominant for many applications because of their energy density and refueling speed.

The Four-Stroke Cycle Explained

Most automotive engines use the four-stroke cycle, often called the Otto cycle in gasoline engines. Each cylinder repeats four distinct strokes: intake, compression, power, and exhaust. The cycle requires two full rotations of the crankshaft to complete.

During intake, the piston moves down and the intake valve opens, drawing in a mixture of air and fuel. On the compression stroke, both valves close and the piston moves up, squeezing the mixture. Near the top, the spark plug fires, igniting the compressed charge. The resulting explosion forces the piston down on the power stroke, producing the work that turns the crankshaft. Finally, the exhaust valve opens and the piston moves up again, pushing out burnt gases.

  • Intake: air and fuel enter the cylinder
  • Compression: mixture is squeezed, raising temperature and pressure
  • Power: spark ignites mixture, expanding gases push piston down
  • Exhaust: burnt gases are expelled

Key Components of an Internal Combustion Engine

A modern engine is a complex assembly of hundreds of parts, but a few core components do the heavy lifting. The cylinder block houses the cylinders and provides the main structure. Inside each cylinder, a piston moves up and down, sealed by piston rings that prevent gases from escaping.

The crankshaft converts the pistons' up-and-down motion into rotation. Connecting rods link the pistons to the crankshaft. The cylinder head sits on top of the block and contains the valves, spark plugs (in gasoline engines), and often the camshaft. The camshaft controls valve opening and closing, timed to the crankshaft via a timing belt or chain.

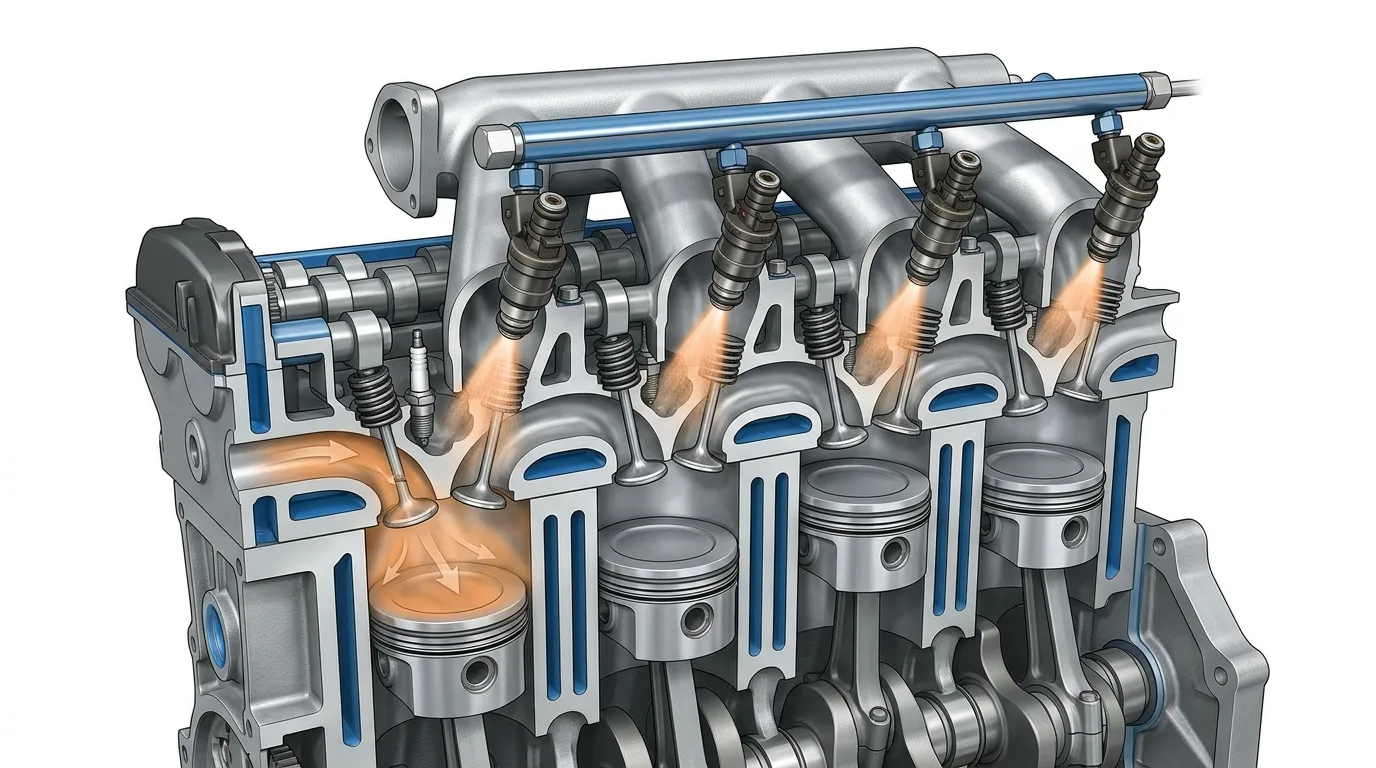
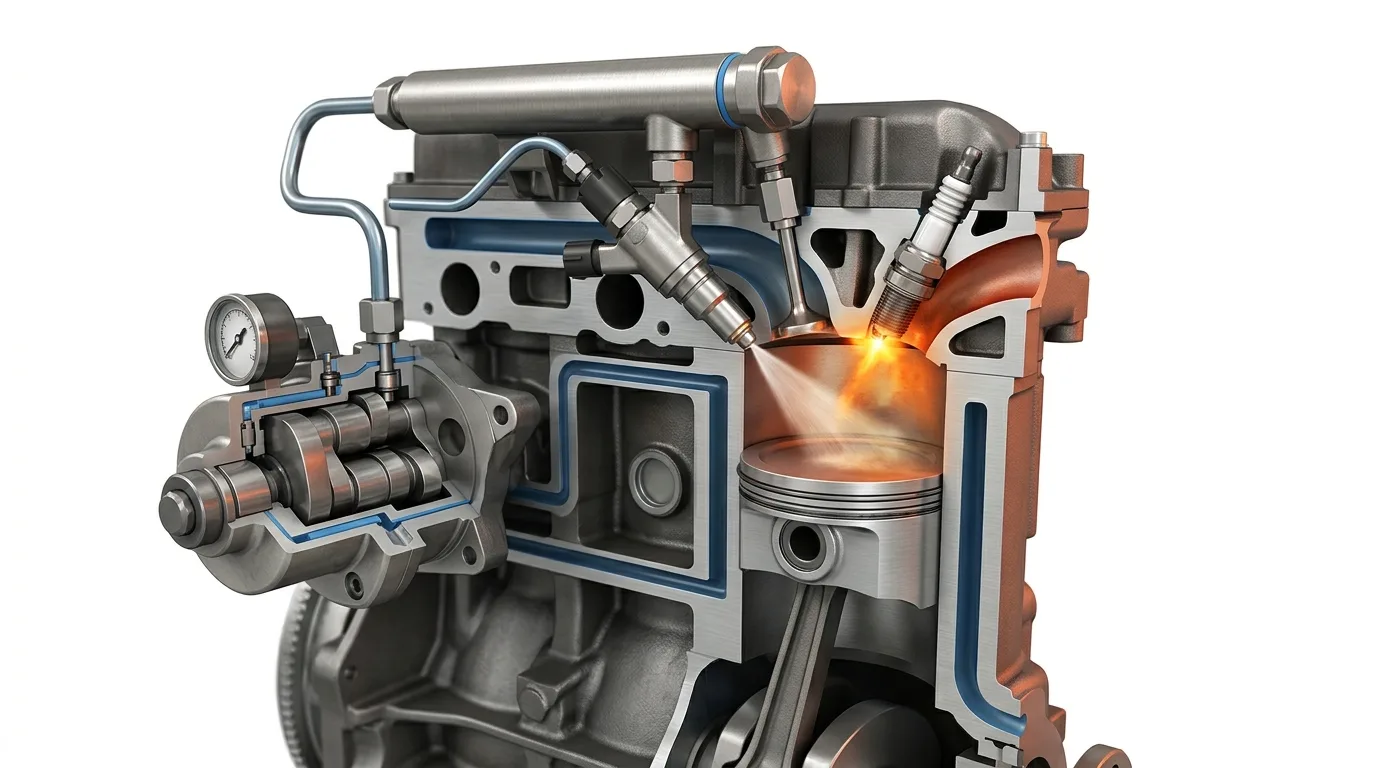
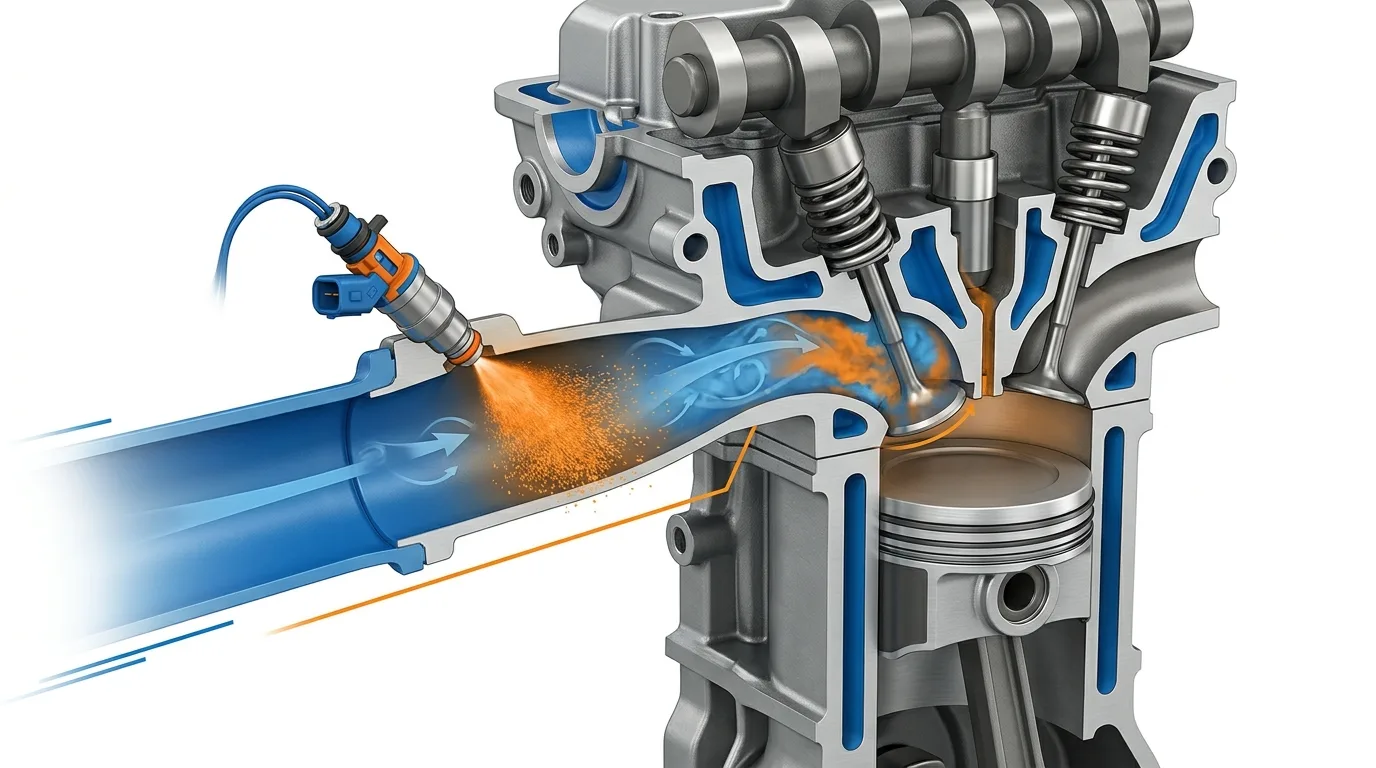
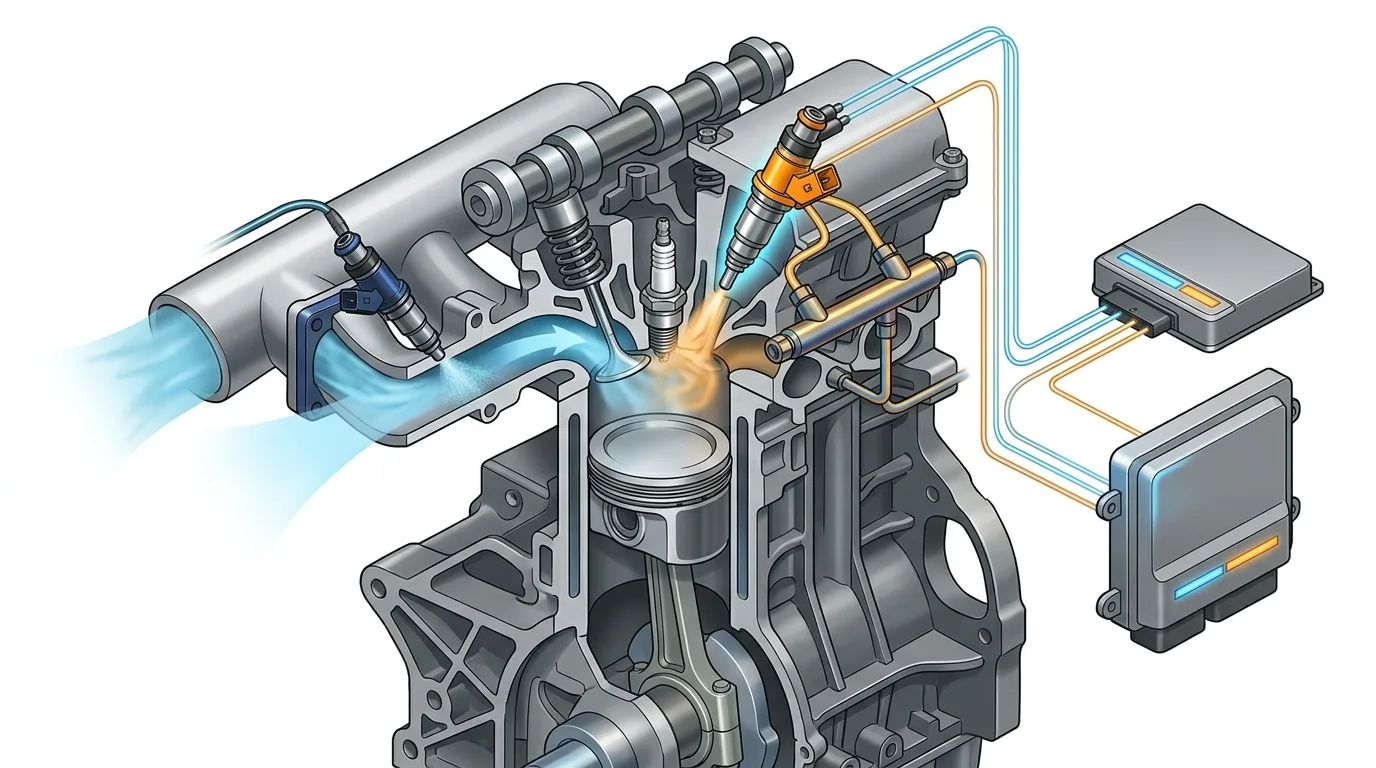
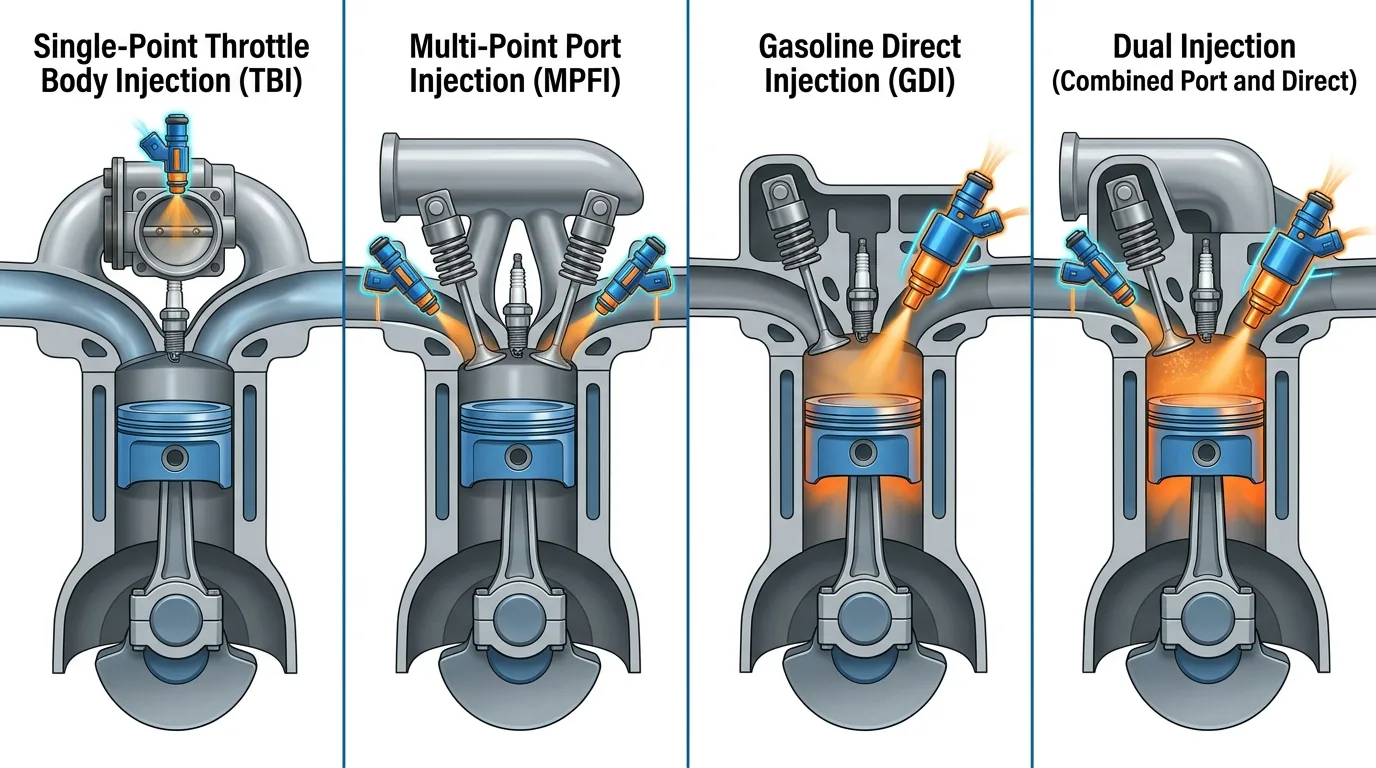
Fuel delivery varies: older engines used carburetors, while modern ones rely on fuel injection, either into the intake port or directly into the cylinder. Ignition systems have also evolved from mechanical points to electronic coils controlled by the engine control unit (ECU).

Gasoline vs Diesel: Two Approaches to Ignition

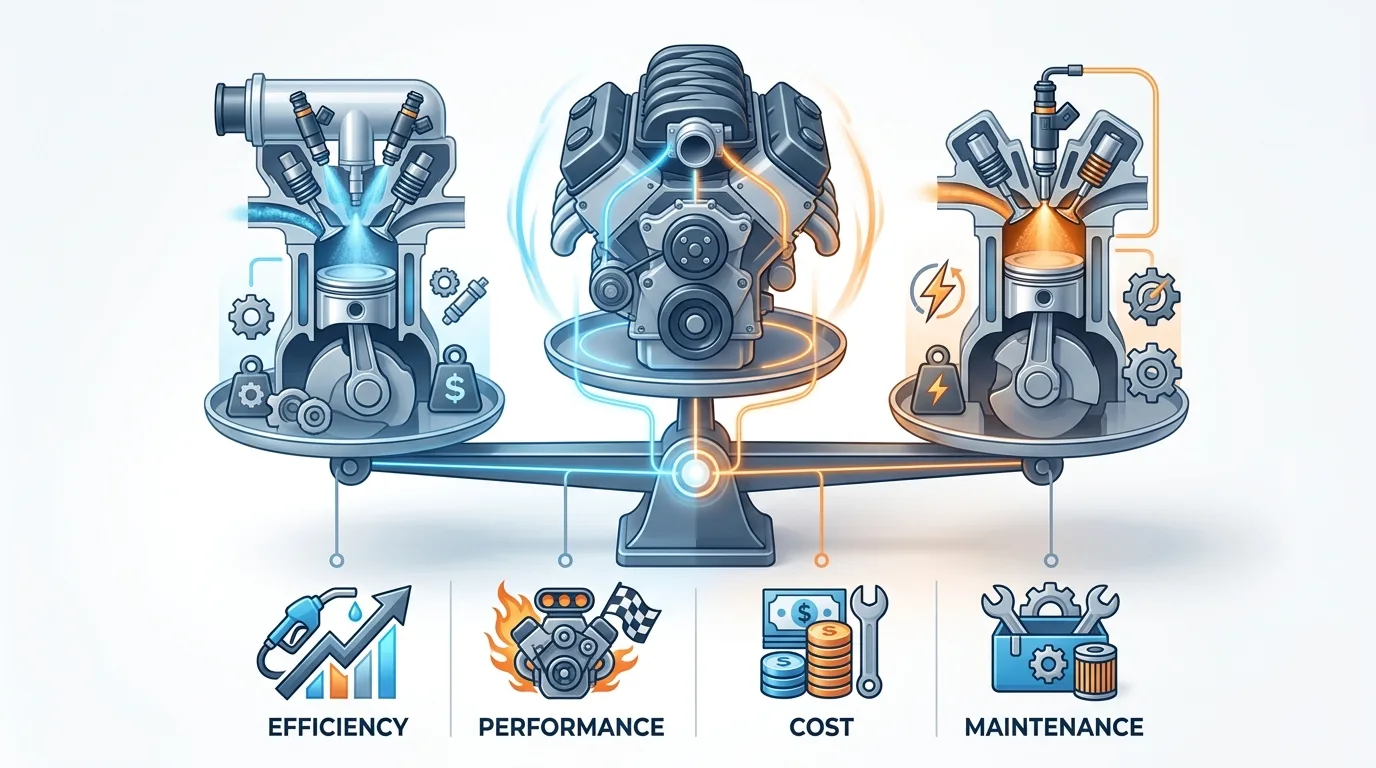
Gasoline engines use spark ignition: a spark plug ignites a premixed air-fuel charge. They tend to run at higher RPMs and are lighter, making them common in passenger cars. Diesel engines use compression ignition: air is compressed to a very high pressure and temperature, then fuel is injected and ignites spontaneously. Diesels are more thermally efficient and produce more torque, which suits trucks and heavy equipment.

The differences affect maintenance. Gasoline engines typically have lower compression ratios and use spark plugs, while diesel engines have higher compression ratios and use glow plugs for cold starts. Diesel fuel also acts as a lubricant for the injection system, so fuel quality matters more.

Efficiency and Emissions: Where the Energy Goes

No engine converts all the chemical energy in fuel into useful work. In a typical gasoline engine, only about 20 to 35 percent of the fuel's energy reaches the wheels. The rest is lost as heat through the exhaust and cooling system, plus friction and pumping losses. Diesel engines can reach 30 to 45 percent efficiency in some applications.

Emissions are a byproduct of combustion. Gasoline engines produce carbon monoxide, hydrocarbons, and nitrogen oxides, which are controlled by catalytic converters and precise fuel management. Diesel engines also produce particulate matter, managed by particulate filters and selective catalytic reduction using urea solution (DEF).

Improving efficiency often means optimizing the air-fuel ratio, using turbocharging to recover exhaust energy, or adding variable valve timing. These technologies are common in modern engines but add complexity and potential failure points.

Practical Maintenance Tips for Longer Engine Life

Regular maintenance is the difference between an engine that lasts 150,000 miles and one that fails at 80,000. Oil changes are the single most important service: clean oil lubricates, cools, and cleans internal parts. Follow the manufacturer's interval, which may range from 5,000 to 10,000 miles depending on oil type and driving conditions.

Other critical checks include the cooling system (coolant level and condition), the air filter (restricted airflow hurts performance and economy), and the timing belt or chain (failure can cause catastrophic damage). Spark plugs should be replaced at recommended intervals to maintain smooth running and fuel economy.

Listen to your engine. Unusual noises, rough idling, or a check engine light are early warnings. Addressing small issues quickly prevents expensive repairs later.

  • Change oil and filter regularly
  • Check coolant level and strength
  • Replace air filter when dirty
  • Inspect and replace spark plugs as scheduled
  • Monitor timing belt/chain and replace per manufacturer

Common Engine Problems and Their Symptoms

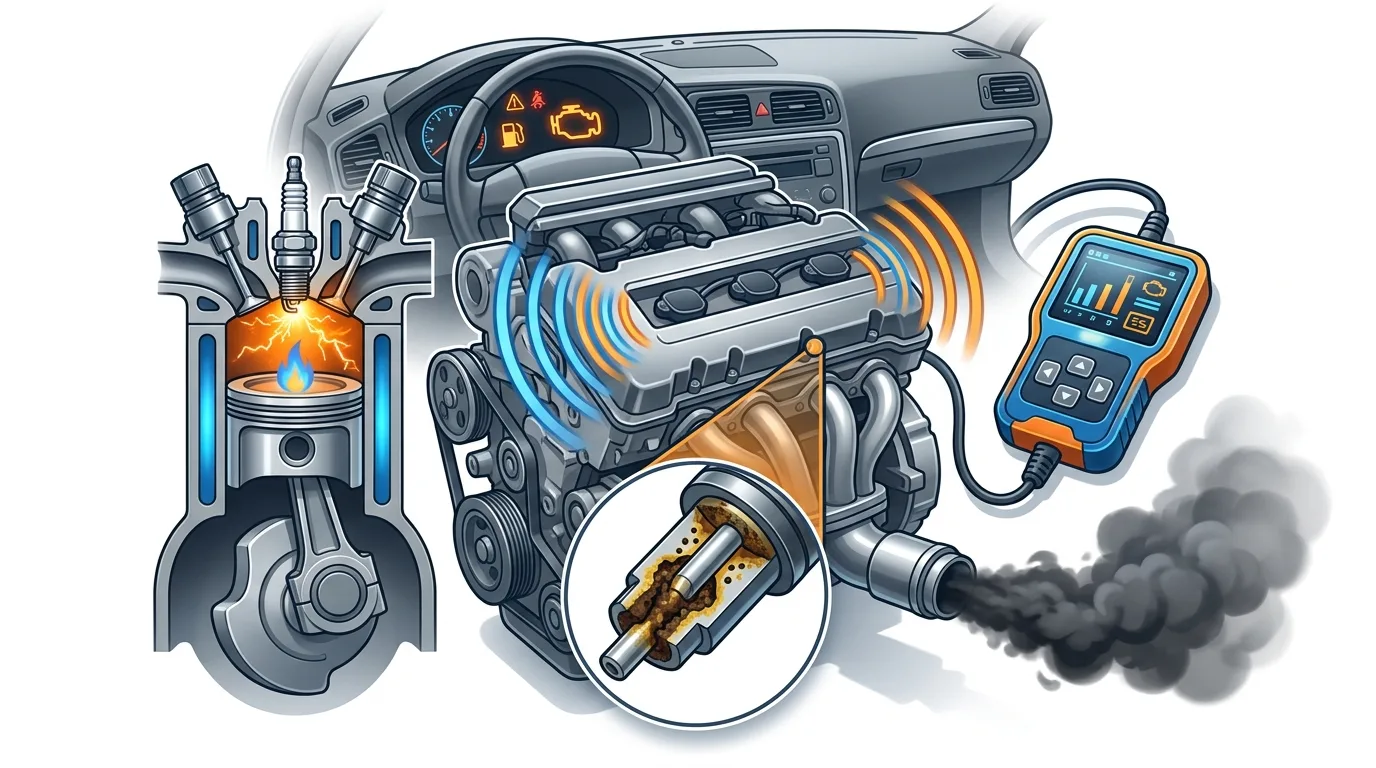
Misfires are a frequent complaint. They can stem from worn spark plugs, faulty ignition coils, or clogged fuel injectors. Symptoms include rough idle, hesitation, and a flashing check engine light. Overheating is another serious issue, often caused by low coolant, a stuck thermostat, or a failing water pump. Ignoring it can warp the cylinder head.

Excessive oil consumption, blue smoke from the exhaust, or a knocking sound can indicate worn piston rings or valve seals. A blown head gasket may show as white smoke, coolant loss, or milky oil. Each problem has specific diagnostic steps, and a scan tool is often the first tool to reach for.

The Future of Combustion Engines

Combustion engines are not disappearing overnight. Automakers continue to refine them with downsizing, turbocharging, and hybridization. Mild hybrid systems use an electric motor to assist and recover energy, reducing fuel consumption without full electrification. Synthetic fuels and hydrogen combustion are also under development, though their widespread adoption is uncertain.

For mechanics and car owners, understanding the fundamentals remains valuable. The laws of thermodynamics do not change, and the same principles apply whether you are tuning a classic carbureted V8 or diagnosing a modern turbocharged four-cylinder. Knowledge of how engines work is the foundation for effective maintenance and repair.


Advertisement

Gasoline Engine: Fundamentals and Operation

You do not need to be an engineer to understand what is happening under your hood. After reading this, you will know the four-stroke cycle well enough to explain it to a friend, understand why your en...

You do not need to be an engineer to understand what is happening under your hood. After reading this, you will know the four-stroke cycle well enough to explain it to a friend, understand why your engine needs spark, fuel, air, and compression to run, and be able to diagnose a rough idle or a no-start with more confidence. Plan on 20 to 30 minutes for the read, plus whatever time you spend actually poking around your own engine.

The goal here is not to turn you into a mechanic. It is to stop you from nodding politely when someone says "you're losing compression on cylinder three" while you quietly wonder if that is bad. It is bad. Here is why.

What you need before you start

You do not need much to follow along. If you want to get hands-on with your own car while reading, grab:

  • Your owner's manual (seriously, it has the firing order and fluid specs)
  • A basic socket set and a screwdriver set
  • A spark plug socket if you plan to pull a plug
  • Safety glasses and nitrile gloves
  • A rag or two
  • A cheap OBD2 scanner or a phone app with a Bluetooth dongle (optional but helpful)

No special tools required for the theory. For the hands-on checks, the basics above will cover 90 percent of what is described here.

Step 1: Understand what a gasoline engine actually does

A gasoline engine converts the chemical energy in fuel into rotating motion. It does this by burning a mixture of gasoline vapor and air inside a sealed chamber, which pushes a piston down, which turns a crankshaft, which eventually turns your wheels.

That is the whole trick. Everything else, the fuel injection, the ignition coils, the sensors, the computer, exists to make that burn happen at the right moment, in the right amount, over and over, thousands of times per minute.

Why it matters: Once you see the engine as an air pump that happens to burn fuel, most diagnosis gets easier. If it runs badly, one of four things is usually wrong: air, fuel, spark, or compression.

Practical tip: Remember the four. When your car acts up, ask which of the four is most likely. That single question solves more problems than any scan tool.

Step 2: Learn the four strokes

Almost every gasoline engine you will ever work on uses the four-stroke cycle. Here is what happens inside one cylinder:

Intake stroke. The piston moves down and the intake valve opens. Air and fuel get pulled in.

Compression stroke. Both valves close. The piston moves up and squeezes the mixture. This is where compression matters, and where a worn engine starts to show its age.

Power stroke. The spark plug fires. The mixture burns and expands fast, driving the piston down. This is the only stroke that makes power.

Exhaust stroke. The exhaust valve opens and the piston pushes burned gases out.

Then it starts over. At idle, each cylinder does this roughly 12 to 15 times per second. At highway speed, it is much faster.

Why it matters: If you know the sequence, you can reason about timing. A car that cranks but will not start might have spark at the wrong time, or no compression, or no fuel. The four strokes tell you what to check first.

Practical tip: A four-cylinder engine at 3,000 rpm is doing about 6,000 power strokes per minute across all cylinders. That is why a single misfire every few seconds is easy to miss by ear but shows up instantly on a scan tool.

Step 3: Map the air and fuel path

Air enters through the air filter, flows past a mass airflow sensor on most modern cars, through the throttle body, into the intake manifold, and down to the intake valves. Fuel is added either just before the intake valve (port injection) or directly into the cylinder (direct injection).

The engine computer decides how much fuel to add based on how much air is coming in, how hot the engine is, and what the oxygen sensors in the exhaust are reporting.

Why it matters: A dirty mass airflow sensor or a clogged air filter throws off that calculation. The engine runs lean or rich, you feel a stumble, and the check engine light comes on. The fix is often cheap.

Practical tip: If your check engine light is on and the car feels down on power, start by pulling the codes. A free OBD code lookup tells you what the code means in plain language before you start guessing at parts.

Step 4: Follow the spark

The ignition system has to deliver a spark at exactly the right instant, thousands of times per minute. On older cars, a distributor handled this. On anything built in the last 20 years, you have coil-on-plug or a coil pack, and the computer fires each cylinder individually.

The spark plug sits in the combustion chamber. Over time, the gap wears, the electrode erodes, and the plug gets harder to fire, especially under load.

Why it matters: Worn plugs cause misfires, rough idle, and poor fuel economy. They are also one of the cheapest things you can replace yourself.

Safety warning: If you are pulling a plug or coil, disconnect the negative battery terminal first, and never touch the coil or plug boot while the engine is running. Ignition systems can deliver a nasty shock.

Practical tip: Pull one plug and look at it. Light tan or grey is normal. Black and sooty means rich. Oily means you have a bigger problem. White and blistered means lean or overheating. The plug is a free diagnostic report on that cylinder.

Step 5: Check the battery and charging system first

Half the "my engine won't start" calls I have seen end with a battery that is four years old and tired. The engine needs a strong crank to build compression. A weak battery cranks slowly, the computer sees low voltage, and everything acts weird.

Check the battery terminals for corrosion. Check the voltage with a multimeter if you have one. A healthy resting battery is usually around 12.4 to 12.7 volts; anything under 12.2 is suspect. Verify that range against your manual or a shop before you replace anything.

Why it matters: A no-start that looks like a fuel or spark problem is sometimes just a weak battery. It costs nothing to rule out.

Safety warning: Batteries produce hydrogen gas and can vent explosive fumes. Do not smoke or create sparks near one. Wear eye protection, and remove the negative cable first when disconnecting, positive first when reconnecting.

Practical tip: If the car cranks slowly and the lights dim, it is the battery or the connections. If it cranks fast and still will not fire, look at fuel or spark.

Step 6: Understand compression, and why it matters most

Compression is the engine's ability to seal the combustion chamber. If the piston rings, valve seats, or head gasket are worn or damaged, compression drops, and the engine loses power and efficiency.

You can test this with a compression gauge, but on many modern engines access is tight and the test takes patience. A leak-down test tells you where the pressure is escaping: rings, intake valve, exhaust valve, or head gasket.

Why it matters: Low compression on one cylinder is the classic reason for a persistent misfire that new plugs and coils will not fix. It is also the difference between a cheap repair and an engine rebuild.

Practical tip: If a misfire code keeps coming back on the same cylinder after you have replaced the coil and plug, get a compression or leak-down test before you throw more parts at it. This is a good moment to use the AI mechanic assistant to help you interpret the symptoms and decide what to test next.

Step 7: Watch the exhaust and the sensors

The exhaust system tells the engine computer how the burn went. Oxygen sensors before and after the catalytic converter measure oxygen content in the exhaust, and the computer adjusts fuel trim based on what they report. If fuel trim drifts far from zero, you have a vacuum leak, a bad sensor, or a fuel delivery problem.

Why it matters: Fuel trim numbers are one of the most useful things you can look at without tearing anything apart. They tell you what the engine is doing, not what you think it is doing.

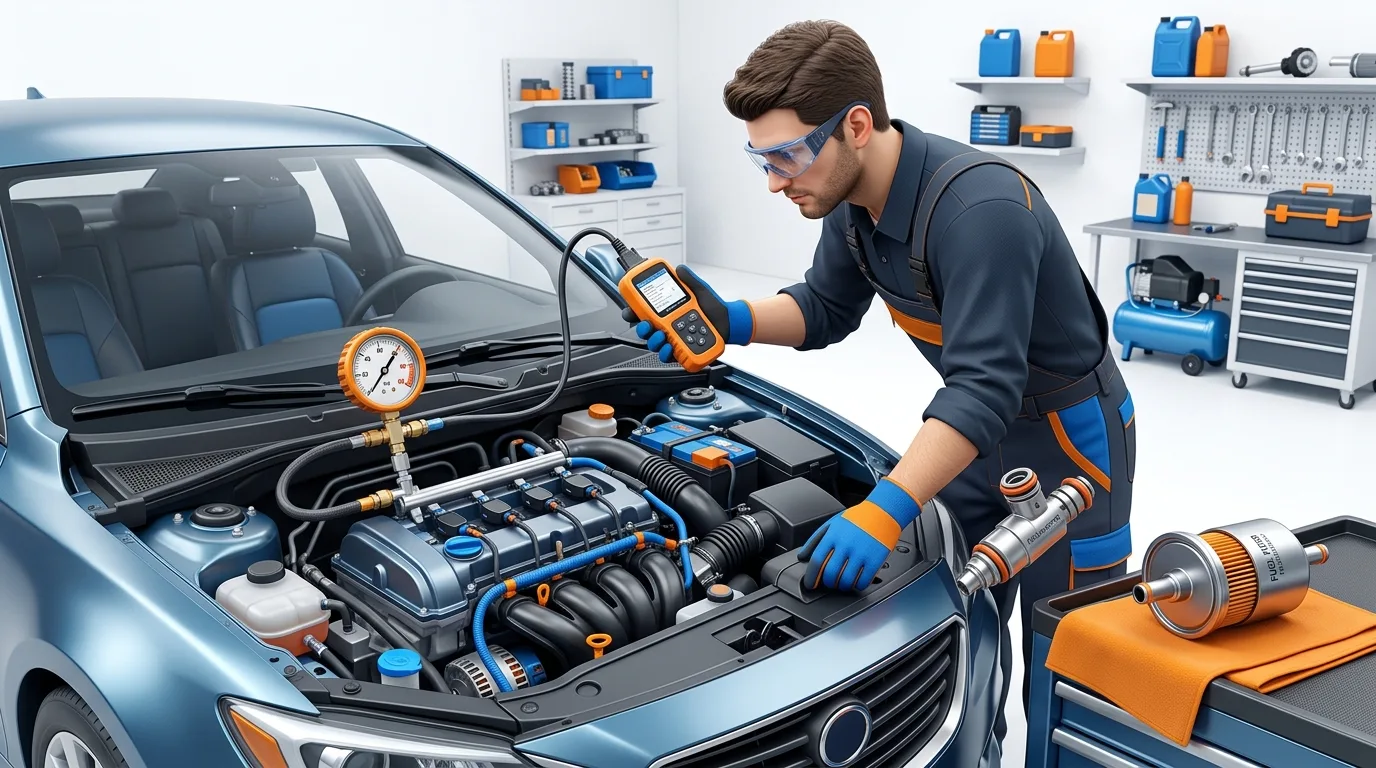
Practical tip: If you have a scan tool that shows live data, watch short-term and long-term fuel trim at idle and at cruise. A live OBD data tool makes this much easier than reading raw values. If trims are pinned positive at idle and normalize at speed, suspect a vacuum leak. If they are pinned positive everywhere, suspect fuel delivery.

Step 8: Know the common failure points

Most gasoline engine problems land in a handful of buckets:

  • Ignition: plugs, coils, wires, or a failing crank or cam sensor
  • Fuel: clogged injectors, weak fuel pump, dirty filter
  • Air: vacuum leaks, dirty MAF, stuck throttle body
  • Compression: worn rings, burnt valve, blown head gasket
  • Sensors and control: oxygen sensors, coolant temp sensor, computer faults

If you can name which bucket your symptom belongs to, you are already ahead of most people who just start swapping parts.

Practical tip: Before you buy anything, write down the symptom, the conditions (hot, cold, idle, load), and any codes. That three-line note is what a good mechanic needs to help you, and it is what an AI diagnostic helper uses to point you in the right direction.

Pro tips

  • Change your air filter on schedule. It is cheap and it matters more than most people think.
  • Use the correct octane. Higher octane does not make more power in an engine designed for regular; it just costs more.
  • Do not ignore a flashing check engine light. Flashing usually means an active misfire that can damage the catalytic converter. Stop and diagnose.
  • Keep a cheap OBD2 dongle in the glovebox. The moment a light comes on, you can read the code before you forget what the car was doing.
  • Check your oil level monthly. Oil does more than lubricate; it helps seal the rings and manage heat.
  • Learn your car's normal. If you know how it sounds and feels when it is healthy, you will notice the small changes early.

Common pitfalls

Throwing parts at a code. A P0301 misfire code does not mean "replace coil." It means cylinder one misfired. Test first, then replace.

Ignoring basic maintenance. Old plugs, a dirty filter, and old oil cause more driveability complaints than any single sensor failure.

Assuming the worst. A rough idle is often a vacuum leak or a dirty throttle body, not a blown engine. Check the cheap things first.

Disconnecting the battery to "reset" everything. On many cars this clears adaptive fuel trims and can make the car run worse for a while. It also wipes emissions readiness monitors, which can fail an inspection. Clear codes with a scan tool instead.

Working on a hot engine. Let it cool. Hot coolant, hot exhaust, and hot oil all burn. This is not a suggestion.

Useful resources

For step-by-step procedures specific to your car, the step-by-step car guides section is a good starting point. If you want to decode a fault code, the free car tools collection includes the OBD lookup and other diagnostic helpers. When you just want to know what a component does, the mechanical encyclopedia covers the parts in plain language. And if a symptom is nagging you and you cannot place it, the car symptom finder narrows it down fast. For general maintenance reading, the AutoTools blog has plenty more.

FAQ

Do I really need premium gas? Only if your owner's manual says so. Engines designed for regular do not benefit from premium. Engines that require premium can be damaged by regular under load. Check the manual.

How often should I change spark plugs? It varies widely. Some plugs last 30,000 miles, some last 100,000. Check your maintenance schedule. Pull one and look at it if you are unsure.

Why does my engine misfire only when cold? Cold-start misfires often point to weak ignition under load, a dirty injector, or a sensor reading off when cold. It is worth scanning for pending codes even if the light is not on yet.

Can I diagnose an engine problem without a scan tool? You can narrow it down, but modern engines rely on the computer for fuel and spark timing. A basic scanner is a worthwhile investment for any DIYer.

What does "blown head gasket" actually mean? The gasket between the cylinder head and the engine block has failed, so coolant, oil, and combustion gases can mix or leak where they should not. Symptoms include white smoke, coolant loss with no visible leak, and overheating. It is a serious repair.

Final thought

You do not have to know everything about your engine to take better care of it. You just have to know the four things it needs, how to read the clues it gives you, and when to stop and get help. That is most of the game. Now go pull a spark plug and see what it tells you.

Read the full original


Gasoline Engine: Ignition, Fuel System and Air-Fuel Mixture

Your car cranks fine but won't catch. Or it starts, then stumbles and shakes at idle. Or the check engine light came on and the scan tool says something about a lean condition. Whatever brought you he...

Your car cranks fine but won't catch. Or it starts, then stumbles and shakes at idle. Or the check engine light came on and the scan tool says something about a lean condition. Whatever brought you here, you're probably wondering the same thing: is this an ignition problem, a fuel problem, or an air-fuel mixture problem?

Here's the honest answer. Those three systems are so tightly linked that a fault in one usually shows up as a symptom in another. A weak spark can look like a fuel problem. A vacuum leak can look like an ignition problem. That's exactly why guessing gets expensive. This guide walks through how ignition, fuel delivery and air-fuel mixture actually work together, what goes wrong, and how to narrow it down without throwing parts at the car.

Why your engine feels like it's misbehaving

A gasoline engine needs three things in the right proportions: spark at the right moment, fuel at the right pressure, and air mixed with that fuel at roughly the right ratio. Get any one of those wrong and you feel it immediately, rough idle, hesitation, misfires, poor fuel economy, or a no-start.

What makes this frustrating for owners is that the symptoms overlap so much. A misfire code doesn't tell you whether the spark plug, the coil, the injector or a vacuum leak is to blame. It just tells you combustion didn't happen properly in that cylinder.

That's the real problem: the symptoms are loud, but the cause is quiet. You need a process, not a guess.

The three systems, and how they rely on each other

Ignition: making the spark

The ignition system takes low-voltage battery power and turns it into a high-voltage spark across the spark plug gap. On older cars a distributor handled the timing. On anything modern, the ECU (engine computer) fires individual coil packs or coil-on-plug units directly, often with no distributor at all.

The parts that wear out: spark plugs, ignition coils, and the wires or boots connecting them. Plugs have a service interval, usually somewhere between 30,000 and 100,000 miles depending on the type, but check your owner's manual because it varies a lot. A worn plug with an eroded gap needs more voltage to fire, which stresses the coil and eventually causes a misfire.

Fuel system: delivering the right amount

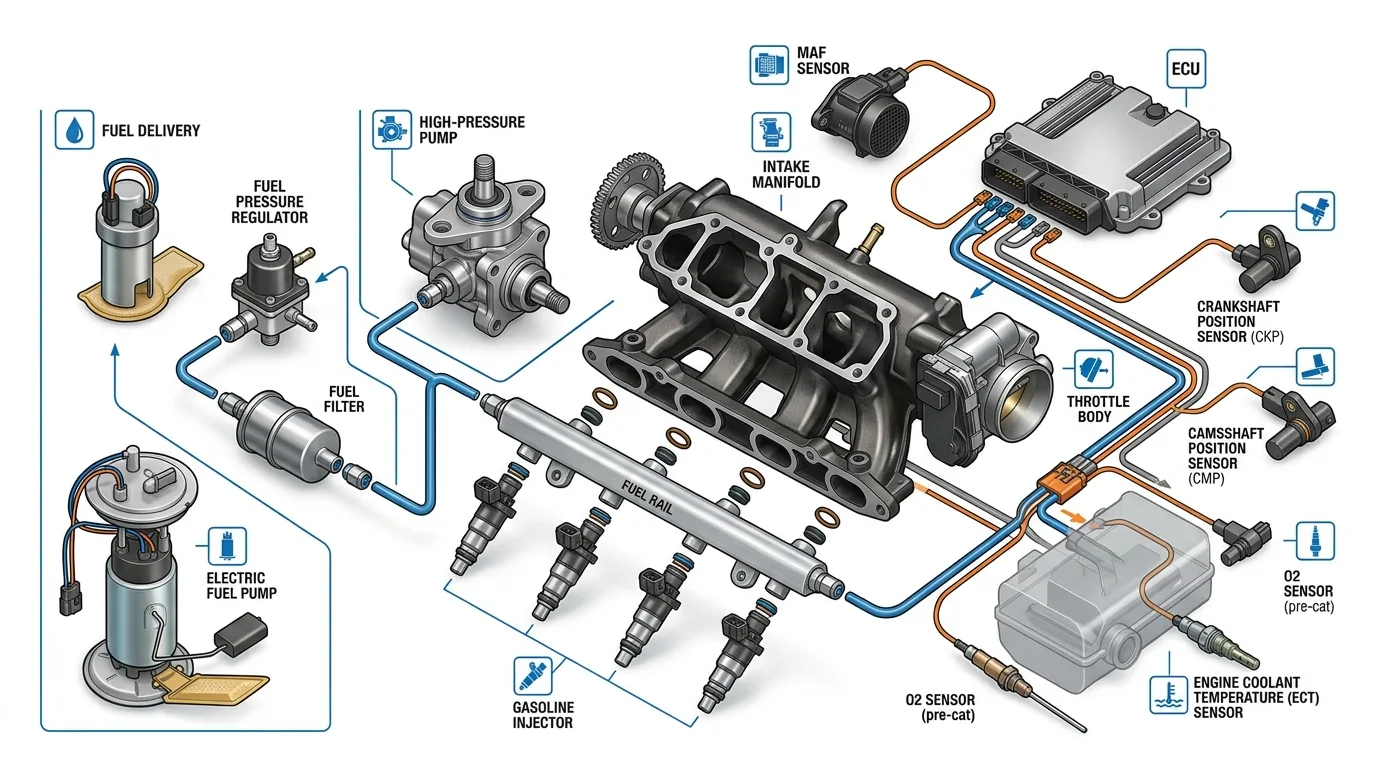
The fuel system moves gasoline from the tank to the injectors at a controlled pressure, then the injectors spray a fine mist into the intake or directly into the cylinder. The pump, filter, pressure regulator and injectors all have to cooperate.

Two things commonly go wrong here. First, pressure drops, often from a tired pump or a clogged filter, so the engine runs lean under load. Second, injectors get dirty and spray unevenly, which causes a rough idle and misfires. Modern direct-injection engines are especially sensitive to injector condition and to carbon buildup on the intake valves.

Air-fuel mixture: the balance point

The air-fuel ratio is the number that ties it all together. Gasoline burns best at a specific ratio of air to fuel, and the ECU constantly adjusts fuel delivery to hit it, using feedback from the oxygen sensors in the exhaust.

Too much air (a lean mixture) runs hot and can cause hesitation and knock. Too much fuel (a rich mixture) wastes gas, fouls plugs and can damage the catalytic converter. The ECU can only compensate so far. Once a vacuum leak or a failing sensor pushes things outside its correction range, you get a check engine light and drivability problems.

If you've got a code and want to know what it actually means before you spend anything, run it through the free OBD code lookup over at /obd. It takes a minute and it stops you from replacing the wrong part.

What usually causes ignition, fuel and mixture problems

Let me give you the short list I'd actually check first, in rough order of how often they show up.

Ignition side: Fouled or worn spark plugs, a cracked coil, corroded coil boots, or a plug gap that's drifted out of spec. On older cars, cap and rotor wear.

Fuel side: A weak fuel pump, a restricted fuel filter, leaking or clogged injectors, or a failing fuel pressure regulator.

Mixture side: Vacuum leaks from cracked intake hoses, a dirty mass airflow sensor, a failing oxygen sensor, a stuck EGR valve, or a leaking intake gasket. These are the sneaky ones because the ignition and fuel systems are working correctly, the engine just can't balance them.

The overlap problem: A vacuum leak leans out the mixture, the ECU adds fuel to compensate, and now you've got rich and lean conditions fighting each other. This is why a single symptom rarely points to a single cause.

Your realistic options for diagnosing and fixing it

Option 1: Scan for codes and live data first

What it is: Plug in an OBD2 scanner, read the stored and pending codes, then watch live sensor data while the engine runs.

How it works: The scanner reads what the computer already knows, fuel trims, oxygen sensor voltage, misfire counts, coolant temp. Watching fuel trims is genuinely revealing. A large positive long-term trim points toward a lean condition, often a vacuum leak or weak fuel delivery. A large negative trim points toward a rich condition.

Advantages: Cheap or free, fast, and it tells you where to look instead of where to guess.

Disadvantages: Codes point to a circuit or a system, not always the exact failed part. You still need to interpret.

When it makes sense: Always, as step one. If you want to see exactly how this works in practice, the OBD live-data tool at /tools/obd-live-data is built for reading those fuel trim and sensor values in real time.

Option 2: The old-school physical checks

What it is: Pull a plug and read it, spray carb cleaner around intake joints to find vacuum leaks, check for spark at each cylinder, inspect hoses and boots.

How it works: You're looking at the parts directly instead of trusting the computer. A plug that's black and sooty tells a different story than one that's white and blistered.

Advantages: Free, and it catches things a scanner can miss, like a cracked intake boot or a plug that's the wrong heat range.

Disadvantages: Takes time, requires some comfort with tools, and spray-testing for leaks needs care around hot exhaust.

When it makes sense: Whenever you have a misfire or rough idle and you want to confirm what the scanner suggested.

Option 3: Replace the usual suspects (parts cannon)

What it is: Throwing plugs, coils, and injectors at the problem and hoping.

How it works: Sometimes it works. Often it doesn't, because you fixed a healthy part and left the actual cause in place.

Advantages: Fast if you guess right.

Disadvantages: Expensive, and it hides the real fault. Worse, replacing a good sensor can introduce a new problem.

When it makes sense: Honestly, rarely. Only when a part is a known wear item and due for replacement anyway.

Option 4: Hand it to a shop with proper diagnostic tools

What it is: A technician uses a scan tool with manufacturer-level data plus a scope or smoke machine to find the fault.

How it works: A smoke machine pressurizes the intake and reveals vacuum leaks instantly. A scope shows actual ignition waveforms. This is how you find the cause in one visit instead of five.

Advantages: Accurate, faster overall, and worth it for intermittent or complex faults.

Disadvantages: Costs money. Diagnostic time at a shop commonly runs somewhere in the range of $100 to $200 or more depending on the shop and the region, though that varies. Verify with your local shop.

When it makes sense: Intermittent misfires, multiple codes, or anything you've already failed to fix yourself.

Which approach fits your situation

If you're a hands-on owner with a basic scanner, start with codes and live data, then do the physical checks. That combination solves most common ignition and mixture problems without spending much.

If you're a busy commuter who just wants the car reliable again, a shop diagnostic is often the cheaper path in the long run, because you pay once for an answer instead of three times for guesses.

If you're dealing with a single confirmed bad part, a worn plug or a clearly dead coil, replacing it is perfectly reasonable and doesn't require a shop.

The point is to match the tool to the symptom, not to your budget alone. Cheap guessing gets expensive fast.

Step-by-step action plan

  1. Write down the symptoms. When does it happen? Cold start, hot idle, under load, at a specific speed? This narrows everything.
  2. Pull the codes. Use a scanner or the lookup at /obd to translate them into plain language.
  3. Read live data if you can. Watch fuel trims and oxygen sensor activity. Large trims tell you lean or rich before you touch a wrench.
  4. Inspect the easy stuff first. Spark plugs, coil boots, intake hoses, and the air filter. Look for cracks, oil fouling, or loose connections.
  5. Check fuel pressure if the symptoms point that way. A weak pump shows up under load, not at idle.
  6. Smoke-test or spray-test for vacuum leaks if fuel trims suggest a lean condition.
  7. Fix one thing at a time. Change one part, clear the code, and re-test. Otherwise you never learn what actually fixed it.
  8. Re-scan and confirm. The code should stay gone through a full drive cycle.

Safety notes: Disconnect the battery negative terminal before working on ignition components, and never pull a spark plug wire while the engine runs on a modern coil-on-plug system, it can damage the coil or the ECU. Let the engine cool before spraying anything flammable near the exhaust. If you're lifting the car, use jack stands, never just a jack.

If you want a broader walkthrough for a specific repair, the step-by-step car guides at /guides cover the common jobs in order. And if you're stuck mid-diagnosis, the AI mechanic assistant at /tools/ai-assistant can help you reason through a weird symptom set.

Common mistakes to avoid

  • Replacing parts before reading codes. Fix: scan first, always.
  • Ignoring fuel trims. Fix: they tell you lean or rich faster than any part swap.
  • Assuming a misfire code means a bad coil. Fix: confirm spark, fuel and compression before condemning the coil.
  • Overtightening spark plugs. Fix: use a torque wrench and the spec in your manual, aluminum heads strip easily.
  • Chasing a vacuum leak with the engine hot. Fix: work on a cold engine and use a smoke test if you can.
  • Clearing codes without fixing the cause. Fix: the light comes back, and you've erased useful history.
  • Mixing up causation and correlation. Fix: change one variable at a time.

Expert takeaway

The single most important lesson: ignition, fuel and air-fuel mixture are one system, not three. A problem in any of them shows up as a problem in the others. Diagnose with data first, fuel trims and codes, then confirm with your eyes and hands. Guessing is the most expensive tool in the box.

If you want to build your diagnostic instincts, the mechanic quiz at /quiz is a low-stakes way to test yourself, and the mechanical encyclopedia at /encyclopedia explains the parts in plain terms when you hit something unfamiliar.

FAQ

What causes a rich air-fuel mixture in a gasoline engine? Usually a failing oxygen sensor, a leaking injector, high fuel pressure, or a dirty mass airflow sensor reporting less air than is actually entering. The ECU adds fuel based on bad data. Check fuel trims first.

Can a bad spark plug cause a lean code? Not directly. A misfiring plug leaves unburned oxygen in the exhaust, and the oxygen sensor can read that as lean, which sometimes triggers a lean code even though fuel delivery is fine. That's why you confirm ignition before chasing a fuel fault.

How do I know if my problem is ignition or fuel? Read live data. If fuel trims are normal and you have a single-cylinder misfire, suspect ignition. If trims are way off across all cylinders, suspect fuel delivery or a vacuum leak.

Does a dirty air filter cause a rich mixture? A severely restricted filter can richen the mixture slightly, but modern ECUs compensate well. It's rarely the main cause of a drivability fault, though it's cheap to rule out.

How often should spark plugs be replaced? It depends on the plug type and engine. Conventional plugs might last around 30,000 miles, while iridium plugs can go much longer. Check your owner's manual, it's the only reliable answer for your car.

Ready to act on what you just read? Decode that warning light with the free OBD code lookup, run the matching car tools to check the numbers yourself, or browse more practical car articles for ideas.

Read the full original


Understanding Gasoline Engine Combustion and Air-Fuel Ratio

Your check engine light came on, the car feels gutless, and someone told you it's "running lean." Or maybe you're just curious why your fuel economy dropped two miles per gallon this month. Either way...

Your check engine light came on, the car feels gutless, and someone told you it's "running lean." Or maybe you're just curious why your fuel economy dropped two miles per gallon this month. Either way, you've landed on the right question: how does gasoline actually burn inside your engine, and what does the air-fuel ratio have to do with any of it?

Here's the short version. Your engine is an air pump that burns fuel, and it only runs well when those two ingredients arrive in roughly the right proportions. Get that ratio wrong and you get poor power, bad mileage, a rough idle, or worse. Understand the ratio, and a lot of confusing symptoms suddenly make sense.

What Actually Happens Inside the Cylinder

Combustion isn't an explosion, despite what movies suggest. It's a fast, controlled burn. The piston squeezes a mixture of air and vaporized gasoline, the spark plug ignites it, and the expanding gases push the piston down. That push is your power.

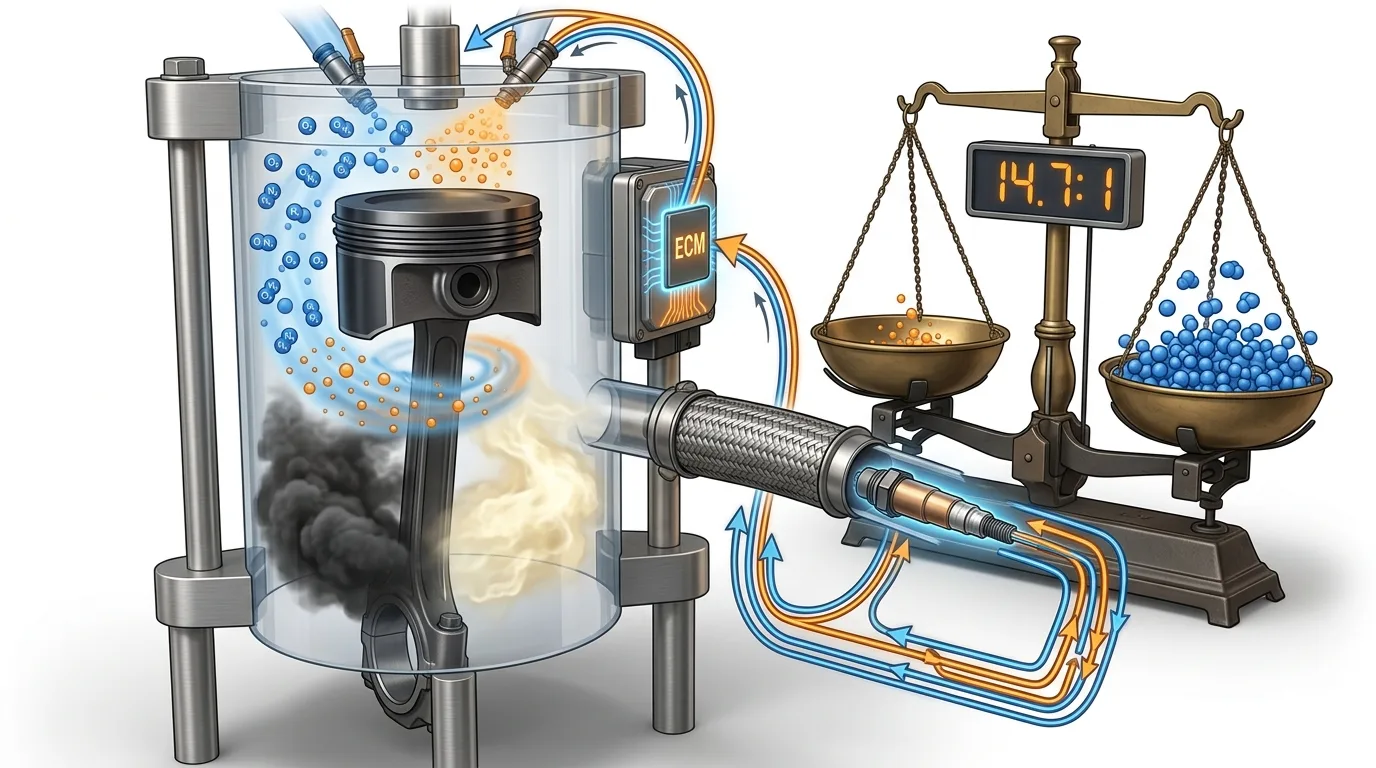
Air is the part people underestimate. Gasoline needs oxygen to burn, and air is where the oxygen comes from. About 14.7 grams of air to 1 gram of gasoline is the chemically "perfect" mix, called the stoichiometric ratio. At that ratio, in theory, all the fuel and all the oxygen cancel each other out.

Real engines rarely sit exactly there. They swing rich (too much fuel) or lean (too little) depending on load, temperature, and what the computer is trying to do.

Why the Ratio Matters More Than You Think

The air-fuel ratio decides three things at once: power, efficiency, and emissions. You can't max out all three at the same time, which is why engine computers are constantly adjusting.

Run rich and you get more power and cooler combustion, but you burn extra fuel and clog your catalytic converter over time. Run lean and you get better economy and lower emissions, until you go too far and combustion gets hot enough to damage pistons and valves.

That's the whole tension. Every symptom you've ever blamed on a "bad engine" often traces back to this balance being off.

The Parts That Keep the Ratio in Check

You don't manage the air-fuel ratio by hand. A few components do it for you, and when one fails, the ratio drifts.

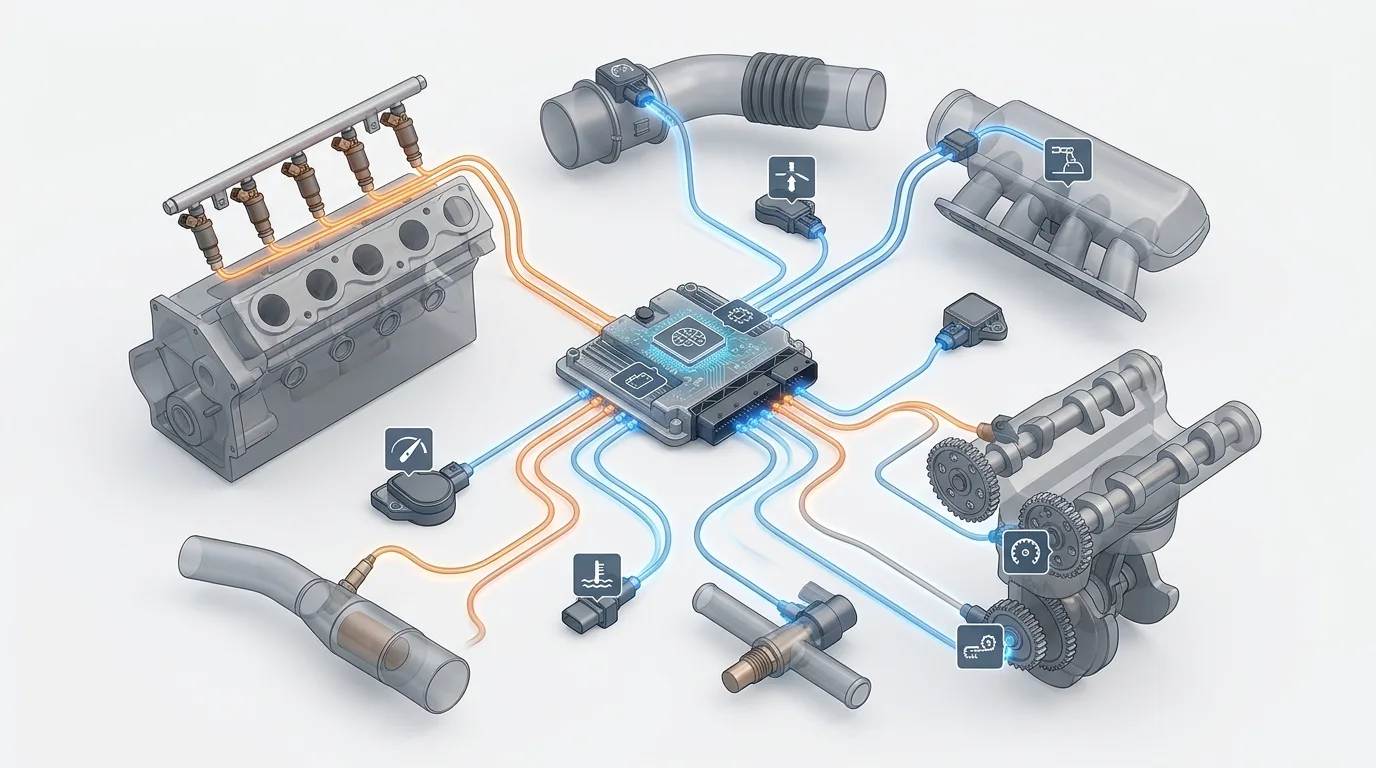
The mass air flow sensor measures how much air is entering. The oxygen sensors (O2 sensors) measure what's left in the exhaust after combustion. The engine control unit reads both and adjusts fuel injector pulse width, meaning how long each injector stays open. Longer pulse, more fuel. Shorter pulse, less.

Throw in the throttle body, fuel pressure regulator, and intake system, and you have a chain of parts where one weak link throws off the whole mixture. This is why a dirty MAF sensor can feel exactly like a failing fuel pump to a driver.

If you want to see these parts in context, the mechanical encyclopedia breaks down how each one fits into the system.

What Lean and Rich Actually Feel Like

This is the part that saves you money at the shop.

A lean condition usually shows up as a rough idle, hesitation when you accelerate, and sometimes a pinging or knocking sound. A rich condition often means black smoke from the tailpipe, a strong gasoline smell, fouled spark plugs, and terrible fuel economy.

Neither one is subtle once you know what to look for. If your car feels fine but the light is on, don't panic, but don't ignore it for months either. Catalytic converters are expensive, and running rich is a common way to kill one.

Reading the Codes and Data

Here's where a scan tool earns its keep. Codes like P0171 (system too lean, bank 1) or P0174 (bank 1 lean, other bank) point you straight at the mixture problem. You can decode them with a free OBD code lookup, and that's usually the fastest way to stop guessing.

Codes tell you what the computer noticed. Live data tells you why. Watching short-term and long-term fuel trims on a live-data tool shows whether the engine is adding fuel or pulling it back, and by how much. A long-term trim of plus 20 percent is the engine screaming that it's starving for fuel or gulping unmetered air.

That single number often separates a five-minute fix from a weekend of parts swapping.

The Solutions, Ranked by Realism

Start with the cheap diagnosis. Clean the mass air flow sensor with the proper spray, check for vacuum leaks with a smoke test or a careful listen, and inspect intake boots for cracks. This costs you almost nothing and catches a surprising number of lean codes.

Replace the obvious wear items. O2 sensors and spark plugs have service lives. If your car is past 100,000 miles and running rich, an aging upstream O2 sensor is a prime suspect. Parts run roughly $40 to $150 each depending on the car, and labor varies widely.

Check fuel delivery. A weak fuel pump or clogged filter causes lean conditions under load. Testing fuel pressure tells you the truth instead of replacing parts on a hunch.

Get a proper diagnosis if you're stuck. A shop with a scan tool and smoke machine can find an intermittent vacuum leak in twenty minutes that you'd chase for a week. Expect to pay for an hour of diagnostic time, often $100 to $200 depending on your area.

Consider a professional tune or reflash only if it fits. Some cars benefit from updated software, but this is not a DIY fix and rarely the answer to a plain mixture problem.

Which Path Fits You?

If you're a hands-on owner with a basic scan tool, start with the free checks: clean the MAF, hunt vacuum leaks, read your fuel trims. You'll solve most lean codes yourself.

If you're a busy commuter with no interest in wrenching, a single diagnostic visit is money well spent. Pay for the diagnosis, get the real cause, then decide whether to fix it yourself.

If you're already deep in a parts-swapping spiral, stop. Pull the live data, look at the trims, and let the numbers point you to the system instead of the part. The AI mechanic assistant can help you interpret a confusing set of readings before you spend another dollar.

Step-by-Step Action Plan

  1. Pull the codes. Write them down before clearing anything. Use the OBD code lookup to understand what each one means.
  2. Look at freeze-frame and live data. Note fuel trims at idle and at cruise. They often differ, and that difference is a clue.
  3. Inspect for vacuum leaks. Check intake hoses, the PCV system, and the intake manifold gasket area. Listen for a hiss at idle.
  4. Clean the MAF sensor. Use only MAF cleaner, never brake cleaner, and let it dry fully before reinstalling.
  5. Test fuel pressure if trims suggest a fuel shortage.
  6. Replace worn sensors and plugs based on mileage and symptoms, not guesswork.
  7. Recheck trims after each change. One fix at a time, so you know what actually worked.

Safety note: disconnect the battery negative terminal before working near wiring, never open the fuel system on a hot engine, and if you lift the car, use jack stands, not just a jack.

Common Mistakes to Avoid

Clearing codes before writing them down. You lose the history that points to the cause. Read first, clear later.

Replacing the O2 sensor when the real problem is a vacuum leak. The sensor is reporting a symptom, not causing it. Fix the leak first.

Using the wrong cleaner on the MAF sensor. It leaves residue and can ruin the sensor. Use the correct spray.

Assuming a lean code means a bad fuel pump. Sometimes it's a $5 vacuum hose. Test before you buy.

Ignoring a rich condition until the catalytic converter dies. Rich running cooks cats. Deal with it early.

Tuning or modifying before the engine runs right. You can't tune around a mechanical fault.

Expert Takeaway

The air-fuel ratio is the language your engine uses to tell you what's wrong. Learn to read fuel trims and codes, and you stop guessing. Most mixture problems come down to unmetered air, weak fuel delivery, or a tired sensor, and a scan tool plus a careful inspection finds the culprit faster than any parts cannon ever will. For a broader walkthrough of diagnostics, the step-by-step car guides are worth bookmarking.

FAQ

What is the ideal air-fuel ratio for a gasoline engine? About 14.7 to 1 by weight is the chemically perfect ratio, but real engines vary it constantly for power, efficiency, and emissions. Your owner's manual won't list a single number because there isn't one.

What happens if the air-fuel mixture is too lean? Combustion runs hotter and can cause hesitation, knocking, and in severe cases piston or valve damage. It also triggers codes like P0171.

What happens if it's too rich? You lose fuel economy, foul spark plugs, and risk damaging the catalytic converter over time. Black smoke and a gasoline smell are common signs.

Can I fix an air-fuel ratio problem myself? Often yes. Cleaning the MAF sensor, finding vacuum leaks, and replacing worn O2 sensors or plugs are realistic DIY jobs. If trims stay off after that, get a professional diagnosis.

How much does it cost to fix a lean condition? It ranges from nearly free (a vacuum hose) to several hundred dollars (fuel pump or O2 sensors), plus diagnostic time. Get the cause confirmed before approving any repair.

Ready to act on what you just read? Decode that warning light with the free OBD code lookup, run the matching car tools to check the numbers yourself, or browse more practical car articles for ideas.

Read the full original


Gasoline Engine Systems: From Carburetor to Fuel Injection

Your car either has a carburetor or fuel injection, and the difference explains a lot about how it starts, idles, and drinks gas. Maybe you just bought an old truck with a carb under the hood and you...

Your car either has a carburetor or fuel injection, and the difference explains a lot about how it starts, idles, and drinks gas. Maybe you just bought an old truck with a carb under the hood and you are not sure what you are looking at. Or your modern car is running rough and someone told you it is "probably the injectors." Either way, you want to understand the system without wading through an engineering textbook.

This is the plain version. By the end you will know how each system delivers gasoline to the engine, why they fail, what it costs to fix them, and how to tell which one you are dealing with.

What does a gasoline engine system actually do?

Strip away the electronics and the job is simple. Gasoline has to mix with air in roughly the right proportion, get into the cylinder, and burn at the right moment. Too much fuel and you waste gas and foul the plugs. Too little and the engine stumbles or overheats.

Everything else, the pump, the lines, the filter, the carburetor or the injectors, exists to get that mix right across every condition: cold mornings, full throttle, highway cruising, stop-and-go traffic. That is the whole game, and the two main designs solve it in very different ways.

The Problem: rough running, bad mileage, and a mystery under the hood

Most people land on this topic because something feels wrong. The car hesitates when you press the gas. It idles like it is gasping. Fuel economy dropped and nobody knows why. Or you opened the hood, saw a metal bowl with linkages on an older car, and realized you have no idea how it works.

The mistake owners make is guessing. They throw parts at the problem, a fuel filter here, a set of plugs there, and hope. That gets expensive fast, especially when the real culprit is a single vacuum leak or a tired fuel pump. Understanding the system first turns guesswork into a short list of suspects.

Why it happens: carburetor versus fuel injection

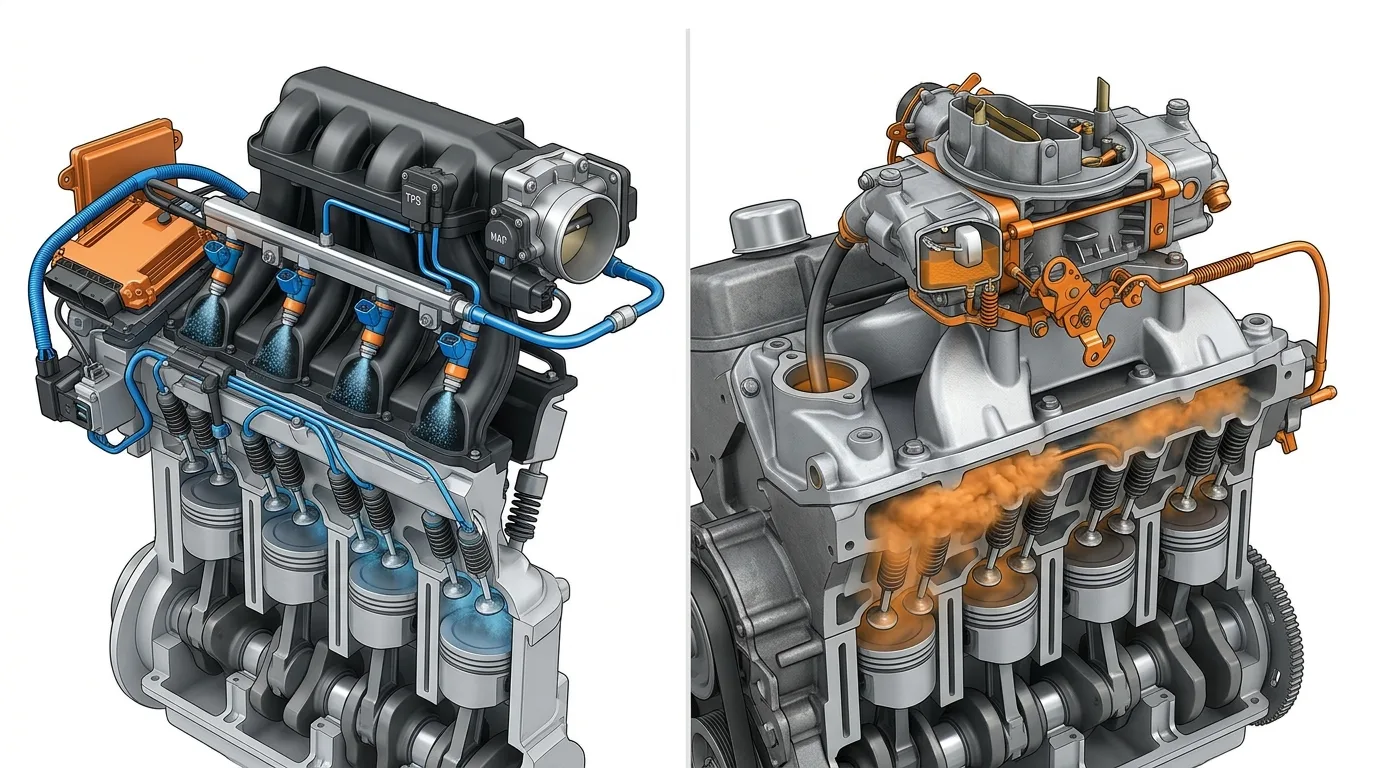
A carburetor uses airflow to pull fuel into the engine. As air rushes through a narrow section called the venturi, it creates a low-pressure zone that sips gasoline out of a bowl and into the airstream. It is clever, mechanical, and entirely dependent on everything being clean and sealed.

Fuel injection skips the guesswork. A pump pressurizes gasoline, and a computer fires solenoids (the injectors) to spray a precise amount at the exact moment. The engine control unit reads sensors, oxygen in the exhaust, air mass, throttle position, and adjusts on the fly.

That is the core difference. A carburetor reacts to physics. Fuel injection reacts to data. Physics does not care that it is minus ten degrees outside. Data does.

The Solutions: your realistic options

Option 1: Keep and tune the carburetor

This is what you do on an older car that still runs one. A carburetor is rebuildable, adjustable, and cheap to work on if you are patient. A rebuild kit often runs somewhere in the $25 to $60 range, and a replacement carb can be $150 to $400 depending on the model, though prices vary a lot.

The upside: no computers, no sensors, and you can tune it with a screwdriver. The downside: it will never be as precise as injection. Cold starts are fussy, altitude and temperature change the mixture, and a worn throttle shaft or a dried-out gasket causes vacuum leaks that make the engine run lean and stumble.

Option 2: Fix the fuel injection you already have

On most cars built after the late 1980s, the injection system is what you have, and the fix is usually a specific failed part rather than the whole system. Common culprits include clogged injectors, a weak fuel pump, a dirty mass airflow sensor, or a vacuum leak at an intake gasket.

Cleaning injectors might run $80 to $150 at a shop. A new fuel pump installed can land anywhere from $300 to $900 depending on the car, since some require dropping the fuel tank. A mass airflow sensor is often $100 to $300 installed. These are rough numbers, so get a quote for your specific vehicle.

Option 3: Diagnose before you replace anything

This is less an option than a discipline, and it saves the most money. Before buying parts, pull the codes. A check engine light on a fuel-injected car is a gift, because the computer already knows something is off. A free OBD code lookup tells you what that code means in plain language, which narrows the field immediately.

If the codes point toward mixture problems, watching live sensor data while the engine runs shows whether the oxygen sensor, airflow sensor, or fuel trims are behaving. That is the difference between a $40 fix and a $400 guess.

Option 4: Convert a carbureted car to fuel injection

Aftermarket fuel injection kits exist for classic engines, and they can transform cold starts and drivability. A basic throttle-body kit often starts around $1,000 to $2,500 plus installation, and a full multi-port setup costs more.

It makes sense if you drive the car regularly and want reliability. It makes no sense if the car is a weekend showpiece you are keeping original for value. Be honest about which one you own.

How to tell which system you have

Pop the hood and look for a few tells. A carburetor sits on top of the engine as a chunky metal assembly with fuel lines and mechanical linkages, often under a round air cleaner. Fuel injection is less obvious: you will see a fuel rail running along the engine with injectors plugged into the intake, plus a tangle of sensors and wiring.

If you are still unsure, the year is a decent clue. Most US-market cars switched to fuel injection between the mid-1980s and early 1990s, but there were exceptions, so check the actual hardware rather than trusting the calendar.

The Best Choice for your situation

There is no single right answer here, because it depends on what you drive and who you are.

If you own a classic with a carburetor and you enjoy tinkering, rebuild and tune it. Learn the adjustment screws, keep the fuel clean, and it will serve you fine.

If you own a modern car with a rough-running engine, do not touch the injection system until you have read the codes. Diagnosis first, parts second.

If you are a busy commuter who just wants the car to start every morning, your job is to find a trusted shop and describe the symptoms clearly. You do not need to become a mechanic. You need to avoid being sold parts you do not need.

If you are somewhere in between, a DIY owner who wants to learn, start with the free car tools and a repair guide for your exact model before you buy anything.

Step-by-Step Action Plan

  1. Identify your system. Look under the hood for a carburetor or a fuel rail and injectors.
  2. Note the symptoms precisely. Does it stumble cold, hot, at idle, or under load? Details matter.
  3. Pull the codes if you have a check engine light. Use the OBD code lookup to translate them.
  4. Check the cheap stuff first. Air filter, fuel filter, vacuum lines, and intake boots.
  5. Watch live data if you can. Fuel trims and oxygen sensor readings reveal a lot, and the OBD live-data tool walks you through it.
  6. Test before replacing. Confirm a failed pump or sensor rather than assuming.
  7. If it is a carburetor, inspect for vacuum leaks and rebuild if the gaskets are tired.
  8. When in doubt, get a second opinion. The AI mechanic assistant can help you frame the question before you call a shop.

Safety notes: disconnect the battery before working near fuel or wiring, and never smoke or work near an open fuel source. Fuel systems hold pressure even when the engine is off, so relieve it properly before opening lines. If you lift the car, use jack stands, never just a jack.

Common Mistakes to Avoid

  • Throwing parts at a symptom instead of diagnosing it. Fix: read the codes and test first.
  • Ignoring vacuum leaks on a carbureted engine. Fix: spray a little carb cleaner around gaskets and listen for idle changes.
  • Assuming a check engine light means a dead sensor. Fix: look up the code, since it often points to a cause elsewhere.
  • Running a carburetor on stale or dirty fuel. Fix: replace the fuel filter and consider a treatment.
  • Opening fuel lines without relieving pressure. Fix: follow the service procedure for your car.
  • Skipping the air filter. Fix: check it every oil change, it takes a minute.

Expert Takeaway

The system does not matter as much as the diagnosis. Whether you have a carburetor or fuel injection, the engine is telling you what is wrong through its symptoms and, on modern cars, its codes. Learn to listen before you spend, and you will fix the real problem the first time.

FAQ

What is the main difference between a carburetor and fuel injection?

A carburetor mixes fuel and air using airflow and mechanical parts. Fuel injection uses a pressurized pump and computer-controlled injectors to spray a precise amount of fuel. Injection is more efficient and better at adapting to temperature and altitude.

Is fuel injection better than a carburetor?

For everyday driving, yes. It starts easier, runs cleaner, and gets better fuel economy. A carburetor can still be the right choice on a classic car you want to keep original or tune yourself.

How do I know if my car has a carburetor or fuel injection?

Look for a chunky metal assembly on top of the engine with linkages, that is a carburetor. A fuel rail with injectors and lots of sensors means fuel injection. Year is a clue but not a guarantee.

Why does my fuel-injected car run rough?

Common causes include dirty injectors, a failing mass airflow sensor, a vacuum leak, or a weak fuel pump. A check engine light and live sensor data will point you toward the right one faster than guessing.

Can I convert my carbureted car to fuel injection?

Yes, aftermarket kits exist. A basic throttle-body kit often runs around $1,000 to $2,500 before installation, with multi-port setups costing more. It is worth it for a regularly driven car, less so for a showpiece you are keeping original.

Ready to act on what you just read? Decode that warning light with the free OBD code lookup, run the matching car tools to check the numbers yourself, or browse more practical car articles for ideas.

Read the full original


The check engine light: the complete guide

What the check engine light means, what to do first, how to read codes and what each common code says — the complete walkthrough.

What the light actually means

The check engine light is the ECM’s way of saying "I detected something outside the expected range". Behind every light there is at least one diagnostic trouble code (DTC) — a five-character code the ECM stores.

  • Steady light: usually emissions or a sensor — not urgent, but read the code soon
  • Flashing light: a severe misfire that can destroy the catalytic converter — stop when safe
  • Light off but code stored: an intermittent fault — check pending codes

What to do first

Before anything, check the simplest causes. A loose or missing fuel cap is behind a surprising number of lights and triggers EVAP codes like P0442 or P0455.

  • Check and tighten the fuel cap
  • Note if the car drives normally or feels wrong
  • Read the code with any OBD-II scanner or the free AutoTools lookup
  • Fix the confirmed cause before clearing the code

The most common codes decoded

These five codes cover a large share of real-world check engine lights. Use the full OBD-II lookup for the complete list.

  • P0300–P0304: misfire — spark plugs, ignition coils, injectors, vacuum leaks
  • P0171/P0174: too lean — vacuum leak, MAF, fuel pressure
  • P0420/P0430: catalyst efficiency below threshold
  • P0128: thermostat stuck open (engine runs cold)
  • P0442/P0455: EVAP system leaks — fuel cap first

When it is safe to drive

A steady light with a normal-feeling car is generally safe for a short trip to a garage or to read the code. A flashing light, a shaking engine or a loss of power means stop and have it towed if possible.

Read the full original


Car Engine Components Explained: The Complete Guide to Parts, Functions, Problems, and Solutions

Your car’s engine is a complex system of parts working together to turn fuel into motion. This complete guide breaks down every major car engine component from the engine block, cylinder head, and DOH...

Your car's engine is a masterpiece of engineering—a complex symphony of metal, fire, and precision that transforms simple fuel into the power that moves you down the road. Whether you're a curious car owner, a budding DIY mechanic, or an automotive student, understanding what's under the hood can save you money, prevent breakdowns, and give you confidence when talking to your mechanic.

In this comprehensive guide, we'll walk through every major engine component, explain how they work together, and help you diagnose common problems before they become expensive disasters.
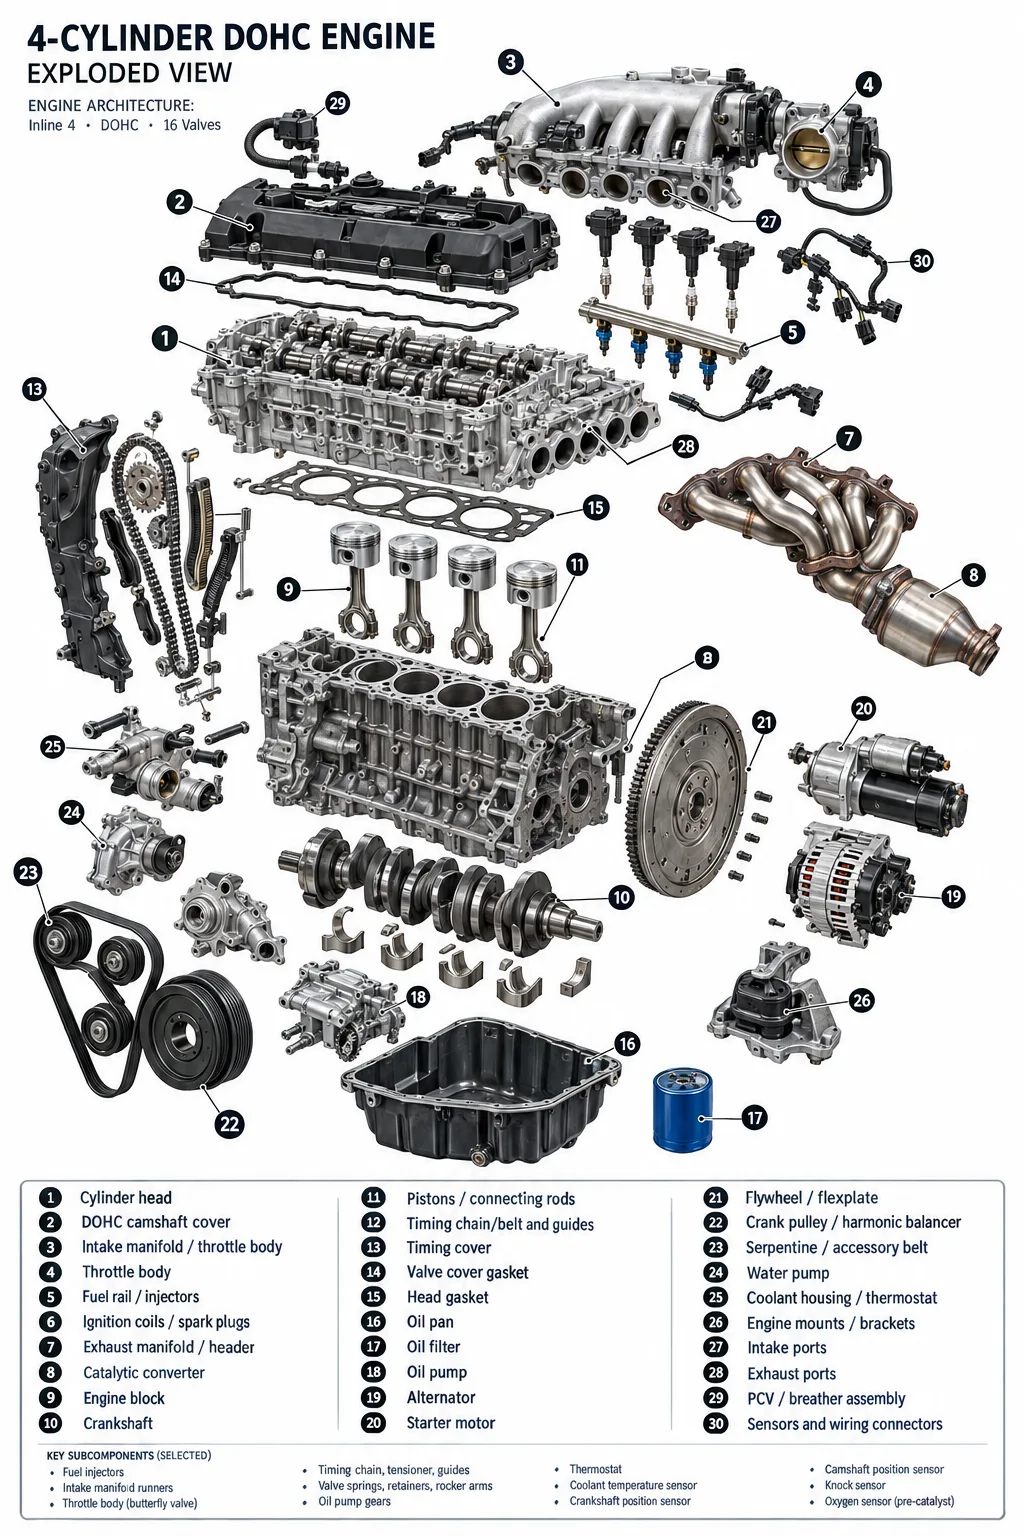
enter image description here


Understanding the Heart of Your Car

What Exactly Is a Car Engine?

At its core, a car engine is a device that converts fuel into motion. It takes the chemical energy stored in gasoline or diesel and transforms it into mechanical energy through controlled explosions—yes, actual tiny explosions happening thousands of times per minute beneath your hood.

The most common type is the internal combustion engine, where fuel burns inside the engine rather than in an external furnace (like a steam engine). This design is efficient, powerful, and has powered automobiles for over a century.

The Basic Sequence: How Power Is Made

Every gasoline engine follows the same fundamental process:

Air + Fuel → Compression → Combustion → Power → Exhaust

Think of it like a controlled fire. You need air (oxygen), fuel (gasoline), and a spark to create combustion. The engine manages this process with incredible precision, timing these events to within milliseconds.

The Four-Stroke Cycle Explained

Most modern car engines use the four-stroke cycle, also known as the Otto cycle. Here's what happens inside each cylinder:

1. Intake Stroke The piston moves down, creating a vacuum that pulls air and fuel into the cylinder through open intake valves. Think of it like a syringe drawing in liquid.

2. Compression Stroke The piston moves back up with both valves closed, squeezing the air-fuel mixture to a fraction of its original volume. This compression makes the mixture volatile and ready to burn.

3. Power Stroke The spark plug ignites the compressed mixture. The resulting explosion forces the piston down with tremendous force—this is where actual power is generated.

4. Exhaust Stroke The piston moves up again, pushing spent gases out through the open exhaust valves. The cycle then repeats, hundreds of times per minute.

What Is a 4-Cylinder Engine?

A 4-cylinder engine has four pistons working together, typically arranged in a straight line (called an inline-4 configuration). This is the most common engine type in modern economy cars for good reason.

Advantages of 4-Cylinder Engines:

  • Fuel efficient
  • Compact and lightweight
  • Lower manufacturing costs
  • Adequate power for daily driving

Limitations:

  • Less power than larger engines
  • Can feel strained under heavy loads
  • More vibration than V6 or V8 engines (though modern balance shafts help)

What Does DOHC Mean?

DOHC stands for Double Overhead Camshaft. This means the engine has two camshafts mounted in the cylinder head—one to operate the intake valves and another for the exhaust valves.

Why DOHC Matters:

  • Better breathing at high RPMs
  • More precise valve control
  • Allows for variable valve timing
  • Typically produces more power than SOHC (Single Overhead Camshaft) designs

Most modern 4-cylinder engines use DOHC designs because they offer an excellent balance of power and efficiency.


Complete Engine Components Overview

Here's your roadmap to every major engine component. We'll cover each in detail throughout this guide.

# Component Main Function
1 Cylinder Head Houses valves and combustion chambers
2 DOHC/Camshaft Cover Protects the valvetrain
3 Intake Manifold Distributes air to cylinders
4 Throttle Body Controls incoming air
5 Fuel Rail & Injectors Deliver fuel
6 Ignition Coils & Spark Plugs Ignite the air-fuel mixture
7 Exhaust Manifold Collects exhaust gases
8 Catalytic Converter Reduces harmful emissions
9 Engine Block Main structural body
10 Crankshaft Converts piston movement into rotation
11 Pistons & Connecting Rods Transfer combustion force
12 Timing Chain/Belt Synchronizes crankshaft and camshafts
13 Timing Cover Protects timing components
14 Valve Cover Gasket Seals the valve cover
15 Head Gasket Seals cylinder head and block
16 Oil Pan Stores engine oil
17 Oil Filter Removes contaminants
18 Oil Pump Circulates engine oil
19 Alternator Produces electrical power
20 Starter Motor Starts the engine
21 Flywheel/Flexplate Transfers engine rotation
22 Crankshaft Pulley Drives accessories and reduces vibration
23 Serpentine Belt Drives accessories
24 Water Pump Circulates coolant
25 Thermostat/Coolant Housing Controls coolant flow
26 Engine Mounts Secure and isolate the engine
27 Intake Ports Deliver air into cylinders
28 Exhaust Ports Remove combustion gases
29 PCV/Breather System Controls crankcase gases
30 Sensors & Wiring Monitor and control engine operation

The Engine Block: The Foundation of Everything

What Is the Engine Block?

The engine block is the main structural component of your engine—the heavy metal casting that contains the cylinders and provides mounting points for virtually every other component. If the engine is the heart of your car, the block is its skeleton.

Its Critical Functions

The engine block:

  • Houses the cylinders where combustion occurs
  • Supports the crankshaft and bearing surfaces
  • Contains passages for oil and coolant
  • Provides mounting points for the cylinder head, accessories, and transmission

Inside the Block

Within the engine block, you'll find:

Cylinders — Precision-bored holes where pistons travel up and down. In a 4-cylinder engine, there are four cylinders arranged in a line.

Crankshaft — The rotating shaft that converts the up-and-down motion of pistons into rotary motion.

Pistons — The moving plugs that fit snugly inside the cylinders and receive the force of combustion.

Connecting Rods — Link the pistons to the crankshaft, transferring force between them.

Main Bearings — Precision bearings that support the crankshaft and allow it to spin smoothly.

Oil Passages — Internal channels that deliver lubricating oil to critical surfaces.

Coolant Passages — Channels that allow coolant to flow around the cylinders, carrying away heat.

Common Engine Block Problems

Cracked Block Usually caused by overheating or freezing (if coolant isn't properly mixed). A cracked block often means the engine is beyond repair.

Cylinder Wear Over time, cylinder walls wear, creating an oval shape that reduces compression and causes oil consumption.

Overheating Damage Excessive heat can warp the block deck surface, causing head gasket failures.

Oil Leaks Failed gaskets and seals allow oil to escape, potentially leading to catastrophic damage if unnoticed.

Coolant Leaks Internal or external coolant leaks can cause overheating and engine damage.

Symptoms of Block Problems

  • White smoke from exhaust (coolant entering combustion)
  • Milky oil (coolant mixing with oil)
  • Persistent overheating
  • Low compression
  • Excessive oil consumption

Prevention Tips

  • Never let your engine overheat
  • Change oil regularly
  • Use the correct coolant mixture
  • Address minor leaks immediately
  • Avoid aggressive driving until the engine is at operating temperature

The Cylinder Head: Where the Magic Happens

Definition and Function

The cylinder head sits atop the engine block, sealing the cylinders and forming the combustion chambers. It's where the intake and exhaust valves live, along with the camshafts in DOHC engines.

The cylinder head must:

  • Seal combustion pressure (which can exceed 1,000 PSI)
  • Manage airflow in and out of the engine
  • Support the valvetrain components
  • Dissipate heat

Main Components

Valves — Poppet valves that open and close to allow air/fuel in and exhaust out. A typical 4-cylinder engine has 16 valves (4 per cylinder).

Camshafts — Rotating shafts with egg-shaped lobes that push the valves open at precisely the right time.

Valve Springs — Return valves to their closed position after the camshaft releases them.

Rockers/Followers — Mechanical links that transfer camshaft motion to the valves.

Combustion Chambers — Shaped cavities where the air-fuel mixture burns.

Intake Ports — Passages that guide air toward the valves.

Exhaust Ports — Passages that guide burned gases away from the valves.

Common Cylinder Head Problems

Warped Cylinder Head Overheating causes the head to warp, breaking the seal with the block and causing head gasket failure.

Cracks Thermal stress can crack the cylinder head, often between valve seats or in the combustion chamber.

Valve Problems Burned valves, bent valves, or worn valve guides cause compression loss and poor performance.

Oil Leaks Failed valve cover gaskets or cam seals allow oil to escape.

Coolant Leaks Cracks or failed gaskets can allow coolant to enter cylinders or leak externally.

Symptoms, Causes, and Solutions

Symptom Likely Cause Solution
White exhaust smoke Coolant entering combustion Check head gasket, inspect head for cracks
Overheating Warped head, failed gasket Machine or replace head, replace gasket
Rough idle Valve problems Valve job or head replacement
Oil in coolant Internal head crack Replace cylinder head
Compression loss Burned/bent valves Valve replacement

DOHC Camshafts and Valvetrain

What Is a Camshaft?

A camshaft is a rotating shaft with precisely shaped lobes (cams) that open and close the engine's valves at exactly the right moment. It's driven by the crankshaft through a timing belt or chain, ensuring perfect synchronization.

What Does DOHC Mean?

DOHC (Double Overhead Camshaft) means the engine has two camshafts in the cylinder head:

  • One operates the intake valves
  • One operates the exhaust valves

This design allows for more precise valve control and better engine breathing, especially at high RPMs.

Intake Camshaft

The intake camshaft controls when air and fuel enter the cylinders. Its lobes are timed to open the intake valves as the piston descends on the intake stroke.

Exhaust Camshaft

The exhaust camshaft controls when burned gases exit. Its lobes open the exhaust valves as the piston rises on the exhaust stroke.

Cam Lobes

The lobes are the egg-shaped bumps on the camshaft that actually push the valves open. Their shape determines:

  • How far the valve opens (lift)
  • How long the valve stays open (duration)
  • When the valve opens and closes (timing)

Valves

Engine valves are precision-machined pieces that must:

  • Withstand extreme temperatures (exhaust valves can reach 1,500°F)
  • Seal perfectly against their seats
  • Operate millions of times without failure

Valve Springs

These heavy-duty springs close the valves after the camshaft releases them. They must be strong enough to close the valve against high combustion pressures.

Rocker Arms/Followers

These mechanical links transfer motion from the camshaft to the valve. Some engines use direct-acting buckets, while others use rocker arms.

Common Valvetrain Problems

Worn Camshaft Lobes wear down, reducing valve lift and engine power.

Incorrect Valve Timing A stretched timing chain or jumped tooth causes valves to open at the wrong time.

Broken Components Valve springs can break, causing valves to drop into cylinders and catastrophic damage.

Excessive Valve Noise Ticking or tapping sounds indicate worn components or low oil pressure.

Diagnostic Symptoms

  • Ticking or tapping from the top of the engine
  • Rough idle
  • Loss of power
  • Check engine light with camshaft codes
  • Metal debris in oil

Solutions

  • Regular oil changes with quality oil
  • Timing chain/belt maintenance
  • Professional diagnosis of unusual noises
  • Prompt repair of any valvetrain issues

Pistons and Connecting Rods

Piston Definition and Function

The piston is a cylindrical plug that moves up and down inside the cylinder. It receives the force of combustion and transfers it to the connecting rod. Pistons must be:

  • Lightweight (to minimize inertia)
  • Strong (to withstand combustion forces)
  • Heat-resistant (to survive extreme temperatures)

Connecting Rod Function

The connecting rod links the piston to the crankshaft. It must be incredibly strong yet lightweight, as it changes direction thousands of times per minute.

Piston Rings

Piston rings seal the gap between the piston and cylinder wall. There are two types:

Compression Rings (top two rings)

  • Seal combustion pressure
  • Transfer heat from piston to cylinder wall

Oil-Control Ring (bottom ring)

  • Scrapes excess oil from cylinder walls
  • Returns oil to the crankcase

Common Problems

Piston Ring Wear Rings lose tension and sealing ability, causing:

  • Low compression
  • Oil consumption
  • Blow-by (combustion gases entering crankcase)

Piston Damage Detonation, overheating, or foreign objects can crack or melt pistons.

Connecting Rod Failure Usually caused by oil starvation or over-revving, this can send a rod through the engine block.

Symptoms

  • Excessive oil consumption
  • Blue smoke from exhaust
  • Low compression
  • Knocking sounds
  • Poor performance

Causes and Solutions

Problem Cause Solution
Oil consumption Worn rings Engine rebuild
Low compression Worn rings/cylinders Rebuild or replace engine
Knocking Rod bearing failure Immediate engine stop, major repair
Piston damage Detonation, overheating Replace pistons, address root cause

The Crankshaft: Converting Motion

Definition and Function

The crankshaft is the backbone of your engine—a precision-machined shaft that converts the reciprocating (up-and-down) motion of pistons into rotating motion that ultimately turns your wheels.

Key Features

Crankshaft Journals — Precision-ground surfaces where the crankshaft rides in bearings.

Connecting Rod Journals — Offset surfaces where connecting rods attach.

Main Bearings — Support the crankshaft in the block.

Counterweights — Balance the crankshaft and smooth out vibrations.

Common Crankshaft Problems

Bearing Wear Worn bearings cause knocking sounds and can lead to crankshaft damage.

Crankshaft Damage Scoring, cracking, or bending requires crankshaft replacement or machining.

Excessive Vibration Can indicate balance problems or worn bearings.

Oil Starvation Lack of lubrication destroys bearings and journals quickly.

Symptoms and Solutions

  • Knocking from deep in the engine → Stop driving immediately
  • Low oil pressure → Check oil level and pressure
  • Excessive vibration → Have crankshaft inspected

The Timing System: Keeping Everything in Sync

Components

Timing Chain or Belt — Connects crankshaft to camshafts.

Tensioner — Maintains proper tension on the chain or belt.

Guides — Keep the chain running straight.

Camshaft Gears — Sprockets on the camshafts.

Crankshaft Sprocket — Gear on the crankshaft.

Function

The timing system synchronizes: Crankshaft ↔ Camshafts ↔ Valves

This synchronization is critical—if the timing is off, valves can open at the wrong time, causing power loss or catastrophic valve-to-piston contact.

Common Problems

Stretched Chain Chains stretch over time, retarding timing and causing poor performance.

Broken Timing Belt A snapped belt causes immediate engine shutdown and often valve damage.

Failed Tensioner Causes chain/belt slack, leading to jumping teeth or complete failure.

Incorrect Timing Results in poor running or engine damage.

Consequences of Timing Failure

  • Rough running
  • Loss of power
  • Engine misfire
  • Valve damage (pistons hit valves)
  • Complete engine failure

Maintenance

  • Replace timing belts every 60,000-100,000 miles
  • Inspect timing chains at 100,000+ miles
  • Replace tensioners and guides with the belt/chain

The Intake System: Breathing In

Components

Air Filter — Cleans incoming air.

Intake Duct — Channels air to the throttle body.

Intake Manifold — Distributes air to cylinders.

Intake Ports — Passages in the cylinder head.

Throttle Body — Controls airflow.

Sensors — Measure airflow and temperature.

Function

The intake system delivers clean, measured air to the engine for combustion.

Common Problems

Dirty Throttle Body Carbon deposits cause sticking and poor idle.

Vacuum Leaks Unmetered air enters the engine, causing lean conditions.

Carbon Buildup Direct injection engines accumulate carbon on intake valves.

Intake Manifold Leaks Cracked or failed gaskets cause vacuum leaks.

Symptoms and Solutions

Symptom Cause Solution
Rough idle Vacuum leak Smoke test, replace gaskets
Poor acceleration Dirty throttle body Clean throttle body
Check engine light Various Scan codes, diagnose
Whistling noise Vacuum leak Locate and repair leak

The Throttle Body: Controlling Power

What Is a Throttle Body?

The throttle body is a valve that controls how much air enters the engine. When you press the gas pedal, you're actually controlling the throttle body (in modern cars, electronically).

Electronic vs. Mechanical

Mechanical Throttle — Cable connects gas pedal to throttle plate.

Electronic Throttle — Sensor detects pedal position, computer controls throttle motor.

Common Problems

Carbon Deposits Cause sticky throttle and poor idle.

Sticking Throttle Can cause unintended acceleration or poor response.

Electronic Failure Throttle position sensor or motor failure triggers limp mode.

Solutions

  • Clean throttle body every 30,000-60,000 miles
  • Replace if electronic components fail
  • Address any drive-by-wire faults promptly

The Fuel System: Delivering Energy

Components

Fuel Tank — Stores gasoline.

Fuel Pump — Pressurizes and delivers fuel.

Fuel Filter — Removes contaminants.

Fuel Rail — Distributes fuel to injectors.

Fuel Injectors — Spray fuel into intake or cylinders.

Pressure Regulator — Maintains proper fuel pressure.

Fuel Injector Function

Fuel injectors are precision solenoids that spray a fine mist of fuel at exactly the right moment. Modern engines use either:

  • Port injection — Fuel sprayed into intake ports
  • Direct injection — Fuel sprayed directly into cylinders

Common Problems

Clogged Injectors Cause misfires, poor performance, and rough idle.

Injector Leakage Drips fuel when closed, causing rich conditions.

Low Fuel Pressure Weak pump or clogged filter causes lean conditions.

Failed Fuel Pump Engine won't start or stalls.

Symptoms and Solutions

Symptom Cause Solution
Misfire Clogged injector Clean or replace injectors
Hard starting Weak fuel pump Replace fuel pump
Poor economy Leaking injector Replace injectors
No start Failed pump Diagnose fuel pressure

The Ignition System: Lighting the Fire

Components

Spark Plugs — Create the spark.

Ignition Coils — Generate high voltage.

Wiring — Delivers voltage to coils.

ECU Control — Times the spark.

Function

The ignition system creates a high-voltage spark at precisely the right moment to ignite the compressed air-fuel mixture.

Common Problems

Worn Spark Plugs Worn electrodes increase gap, requiring more voltage and causing misfires.

Failed Ignition Coil Causes dead cylinder and misfire.

Misfire Can be caused by plugs, coils, or fuel issues.

Symptoms

  • Rough idle
  • Poor acceleration
  • Check engine light (flashing = serious)
  • Increased fuel consumption

Solutions

  • Replace spark plugs every 30,000-100,000 miles
  • Replace failed coils
  • Diagnose misfire codes systematically

The Exhaust System: Breathing Out

Components

Exhaust Manifold — Collects exhaust from cylinders.

Oxygen Sensors — Monitor exhaust oxygen content.

Catalytic Converter — Reduces harmful emissions.

Exhaust Pipes — Carry gases to the rear.

Muffler — Reduces noise.

Catalytic Converter Explained

The catalytic converter uses precious metals (platinum, palladium, rhodium) to convert harmful gases into less harmful ones:

  • Carbon monoxide → Carbon dioxide
  • Hydrocarbons → Water and carbon dioxide
  • Nitrogen oxides → Nitrogen and oxygen

Common Problems

Exhaust Leaks Cause noise, poor performance, and failed emissions tests.

Clogged Catalytic Converter Restricts exhaust flow, causing power loss.

Failed Oxygen Sensor Causes rich or lean conditions and poor economy.

Symptoms and Solutions

Symptom Cause Solution
Loud noise Exhaust leak Repair or replace components
Power loss Clogged cat Replace catalytic converter
Check engine light O2 sensor Replace sensor
Failed emissions Various Diagnose and repair

The Lubrication System: Lifeblood of Your Engine

Components

Engine Oil — Lubricates and cools.

Oil Pan — Stores oil.

Oil Pump — Circulates oil.

Oil Filter — Removes contaminants.

Oil Passages — Deliver oil throughout engine.

How Engine Lubrication Works

The oil pump draws oil from the pan and pushes it through the filter and into passages that lead to:

  • Crankshaft bearings
  • Camshaft bearings
  • Cylinder walls
  • Valve train

Oil creates a thin film that prevents metal-to-metal contact, reducing friction and wear.

Why Engine Oil Matters

  • Reduces friction and wear
  • Cools internal components
  • Cleans engine internals
  • Seals gaps between parts
  • Prevents corrosion

Common Problems

Low Oil Pressure Caused by low oil level, worn pump, or worn bearings.

Oil Leaks Failed gaskets and seals allow oil to escape.

Oil Consumption Worn rings or valve guides allow oil into combustion chamber.

Dirty Oil Neglected changes cause sludge and accelerated wear.

Solutions and Maintenance

  • Check oil level regularly
  • Change oil every 5,000-10,000 miles
  • Use correct oil viscosity
  • Address leaks promptly
  • Never ignore oil pressure warning

The Cooling System: Keeping It Cool

Components

Water Pump — Circulates coolant.

Thermostat — Regulates coolant flow.

Radiator — Dissipates heat.

Coolant — Transfers heat.

Cooling Passages — Channels in engine block and head.

Hoses — Connect components.

Cooling Fan — Pulls air through radiator.

How the Cooling System Works

  1. Coolant absorbs heat from the engine
  2. Water pump circulates coolant to the radiator
  3. Thermostat regulates flow to maintain optimal temperature
  4. Radiator releases heat to the air
  5. Coolant returns to the engine to absorb more heat

Common Problems

Overheating Caused by low coolant, failed thermostat, or failed water pump.

Coolant Leaks Failed hoses, radiator, or water pump.

Failed Thermostat Stuck open (engine runs cold) or stuck closed (overheating).

Failed Water Pump No circulation, rapid overheating.

Radiator Blockage Restricted flow causes overheating.

Symptoms, Causes, and Solutions

Symptom Cause Solution
Overheating Various Stop driving, diagnose cooling system
Coolant loss Leak Pressure test, repair leak
Heater not working Low coolant, air pocket Bleed cooling system
Coolant in oil Head gasket Replace head gasket

Oil Pump and Oil Filter: Detailed Look

Oil Pump

Definition — A pump that circulates engine oil under pressure.

Function — Draws oil from the pan and pushes it through the lubrication system.

Failure Symptoms:

  • Low oil pressure warning
  • Knocking sounds
  • Engine damage

Causes of Failure:

  • Wear over time
  • Oil starvation
  • Contaminated oil

Solutions:

  • Replace oil pump
  • Address root cause
  • Regular oil changes

Oil Filter

Definition — A filter that removes contaminants from engine oil.

Function — Traps metal particles, dirt, and sludge before oil reaches critical components.

Filter Contamination:

  • Clogged filter bypasses dirty oil
  • Causes accelerated wear

Replacement:

  • Every oil change
  • Use quality filters
  • Never skip filter changes

The Alternator: Powering Your Car's Electronics

Definition and Function

The alternator generates electrical power to charge the battery and run your car's electrical systems while the engine is running.

How It Charges the Battery

The alternator converts mechanical energy from the engine into electrical energy through electromagnetic induction. It produces alternating current (AC), which is converted to direct current (DC) by internal diodes.

Common Problems

Weak Charging Worn brushes or failed regulator causes low voltage.

Bearing Noise Worn bearings cause whining or grinding.

Failed Regulator Causes overcharging or undercharging.

Worn Brushes Prevent current flow to the rotor.

Symptoms and Solutions

Symptom Cause Solution
Battery light on Charging issue Test alternator
Dim lights Low voltage Replace alternator
Whining noise Bearing failure Replace alternator
Dead battery No charging Diagnose charging system

The Starter Motor: Bringing Your Engine to Life

Definition and Function

The starter motor is an electric motor that cranks the engine until it starts running on its own power.

Starting Sequence

Battery → Starter → Crankshaft → Combustion

  1. You turn the key or press the button
  2. Battery sends power to the starter
  3. Starter engages the flywheel
  4. Flywheel turns the crankshaft
  5. Engine begins its four-stroke cycle
  6. Combustion takes over

Common Problems

Clicking Often indicates low battery or bad solenoid.

Slow Cranking Weak battery or failing starter.

No Crank Ignition switch, starter relay, or starter failure.

Starter Failure Worn brushes or failed windings.

Diagnosis and Solutions

  • Test battery voltage
  • Check starter relay
  • Test starter draw
  • Replace failed components

Flywheel / Flexplate: Transferring Power

Function

The flywheel (manual transmission) or flexplate (automatic transmission) connects the engine to the transmission and provides a mounting surface for the starter.

Manual vs. Automatic

Flywheel — Heavy, provides momentum for smooth engagement.

Flexplate — Lighter, allows torque converter attachment.

Common Problems

Cracked Flywheel Causes vibration and noise.

Worn Teeth Prevents starter engagement.

Excessive Vibration Can indicate balance issues.

Dual-Mass Flywheel Problems Springs wear out, causing chatter and vibration.


Serpentine Belt and Accessories

Components Driven by the Belt

  • Alternator
  • Water pump
  • A/C compressor
  • Power steering pump (where applicable)

Common Problems

Cracks Indicate aging and imminent failure.

Belt Slipping Causes squealing and poor accessory performance.

Belt Noise Squealing or chirping indicates wear or misalignment.

Belt Failure Leaves you stranded with no charging or cooling.

Inspection and Replacement

  • Inspect every 30,000 miles
  • Replace every 60,000-100,000 miles
  • Replace tensioner and idler pulleys with belt

Engine Mounts: Holding It All Together

Function

Engine mounts:

  • Support the engine
  • Reduce vibration
  • Isolate engine movement from the chassis

Common Problems

Cracked Rubber Causes excessive engine movement and vibration.

Hydraulic Mount Failure Leaks fluid, loses damping ability.

Excessive Engine Movement Causes clunking and stress on other components.

Symptoms and Solutions

Symptom Cause Solution
Vibration at idle Worn mount Replace mount
Clunking on acceleration Broken mount Replace mount
Excessive movement Failed mount Replace mount

Sensors and Engine Electronics

Modern engines rely on numerous sensors to monitor and control operation. Here's a breakdown of the most important ones:

Crankshaft Position Sensor

Definition — Monitors crankshaft speed and position.

Function — Tells the ECU when to fire injectors and spark plugs.

Location — Near the crankshaft, often at the front or rear of the engine.

Failure Symptoms — No start, stalling, misfire.

Diagnostic Codes — P0335, P0336.

Causes — Heat damage, contamination, wiring issues.

Solutions — Replace sensor, check wiring.

Camshaft Position Sensor

Definition — Monitors camshaft position.

Function — Helps ECU determine valve timing.

Location — Near camshaft, often on cylinder head.

Failure Symptoms — Rough running, no start, poor economy.

Diagnostic Codes — P0340, P0341.

Causes — Wear, contamination, wiring.

Solutions — Replace sensor.

Oxygen Sensor

Definition — Measures oxygen in exhaust.

Function — Helps ECU adjust fuel mixture.

Location — In exhaust manifold or pipe.

Failure Symptoms — Poor economy, failed emissions, check engine light.

Diagnostic Codes — P0130-P0167.

Causes — Contamination, age, heater failure.

Solutions — Replace sensor.

Mass Airflow Sensor (MAF)

Definition — Measures air entering engine.

Function — Primary input for fuel calculation.

Location — Between air filter and throttle body.

Failure Symptoms — Rough idle, poor acceleration, stalling.

Diagnostic Codes — P0100-P0104.

Causes — Contamination, age.

Solutions — Clean or replace sensor.

Manifold Absolute Pressure Sensor (MAP)

Definition — Measures intake manifold pressure.

Function — Calculates engine load.

Location — On intake manifold.

Failure Symptoms — Poor performance, rough idle.

Diagnostic Codes — P0105-P0109.

Causes — Vacuum leaks, sensor failure.

Solutions — Repair leaks, replace sensor.

Coolant Temperature Sensor

Definition — Measures coolant temperature.

Function — Controls fuel mixture and cooling fan.

Location — On engine block or cylinder head.

Failure Symptoms — Poor economy, overheating, hard starting.

Diagnostic Codes — P0115-P0119.

Causes — Age, contamination.

Solutions — Replace sensor.

Knock Sensor

Definition — Detects engine knock (detonation).

Function — Allows ECU to retard timing.

Location — On engine block.

Failure Symptoms — Power loss, poor economy.

Diagnostic Codes — P0325-P0334.

Causes — Damage, wiring issues.

Solutions — Replace sensor.

Throttle Position Sensor (TPS)

Definition — Monitors throttle plate position.

Function — Tells ECU driver demand.

Location — On throttle body.

Failure Symptoms — Poor acceleration, surging, stalling.

Diagnostic Codes — P0120-P0124.

Causes — Wear, contamination.

Solutions — Clean or replace throttle body.


PCV / Crankcase Ventilation System

What Is PCV?

PCV stands for Positive Crankcase Ventilation. It's a system that removes harmful gases from the crankcase and recirculates them into the intake to be burned.

Why Crankcase Gases Must Be Controlled

Combustion gases (blow-by) leak past piston rings into the crankcase. These gases contain:

  • Unburned fuel
  • Water vapor
  • Acids

If not removed, they cause:

  • Oil contamination
  • Sludge formation
  • Seal damage
  • Corrosion

PCV Valve Function

The PCV valve regulates the flow of crankcase gases into the intake manifold. It's a simple but critical component.

Common Problems

Clogged PCV Valve Causes pressure buildup and seal leaks.

Failed PCV Valve Causes rough idle and oil consumption.

Symptoms and Solutions

Symptom Cause Solution
Oil leaks Clogged PCV Replace PCV valve
Rough idle Failed PCV Replace PCV valve
Oil consumption PCV issue Inspect and replace

Head Gasket: The Critical Seal

What Is a Head Gasket?

The head gasket is a critical seal between the cylinder head and engine block. It must contain:

  • Combustion pressure (1,000+ PSI)
  • Coolant
  • Oil

Function

The head gasket:

  • Seals combustion chambers
  • Separates oil and coolant passages
  • Transfers heat between head and block

Why It's Important

A failed head gasket causes:

  • Coolant entering cylinders
  • Oil and coolant mixing
  • Compression loss
  • Overheating

Head Gasket Failure Explained

Oil/Coolant Mixing Coolant enters oil passages or vice versa, creating milky oil or oily coolant.

Coolant Loss Coolant enters cylinders and burns, causing white smoke and overheating.

Compression Loss Combustion gases escape into coolant or atmosphere.

Overheating Can cause or result from head gasket failure.

Symptoms, Causes, and Diagnosis

Symptom Cause
White smoke Coolant in combustion
Milky oil Coolant in oil
Bubbles in coolant Compression leak
Overheating Coolant loss
Sweet exhaust smell Coolant burning

Repair Options

  • Replace head gasket
  • Machine cylinder head if warped
  • Address root cause (overheating)

Common Engine Problems: Troubleshooting Table

Problem Possible Causes Symptoms Possible Solutions
Engine overheating Thermostat, coolant leak, water pump High temperature gauge Diagnose cooling system
Engine misfire Spark plugs, coils, injectors Shaking, poor power Diagnose ignition/fuel
Low oil pressure Oil pump, low oil, worn bearings Oil warning light Check pressure immediately
Excessive oil consumption Rings, seals, leaks Frequent oil top-ups Inspect engine
Hard starting Battery, starter, fuel, ignition Slow/no start Diagnose starting system
Rough idle Vacuum leak, throttle, sensors Unstable RPM Scan and inspect
Loss of power Intake, fuel, ignition, exhaust Slow acceleration Diagnose systematically
White smoke Coolant entering combustion White exhaust Check head gasket/cylinder head
Blue smoke Oil burning Blue exhaust Check rings/seals
Black smoke Too much fuel Dark exhaust Check fuel/air system

Engine Diagnostic Guide: Step-by-Step

Step 1 — Identify the Symptom What exactly is the car doing? When does it happen? How often?

Step 2 — Read Warning Lights Check engine light? Oil pressure? Temperature? Each tells a story.

Step 3 — Scan OBD-II Codes Use a scan tool to read diagnostic trouble codes. These point you in the right direction.

Step 4 — Check Fluids Oil level and condition, coolant level and condition, other fluids.

Step 5 — Inspect Visible Components Look for leaks, damage, loose connections, worn belts.

Step 6 — Test Sensors Use a multimeter to test sensor resistance and voltage.

Step 7 — Compression Test Measures cylinder sealing. Low compression indicates internal problems.

Step 8 — Leak-Down Test Identifies where compression is escaping (rings, valves, head gasket).

Step 9 — Repair Fix the identified problem using proper procedures.

Step 10 — Verify the Repair Clear codes, test drive, confirm the problem is solved.


Engine Maintenance Schedule

Every Few Weeks

  • Check engine oil level
  • Check coolant level
  • Look for leaks under the car
  • Listen for unusual noises

Regular Service (Every 5,000-10,000 Miles)

  • Change engine oil
  • Replace oil filter
  • Check air filter
  • Inspect spark plugs
  • Check belts and hoses

Long-Term Maintenance

  • Timing belt/chain inspection (60,000-100,000 miles)
  • Coolant replacement (every 30,000-60,000 miles)
  • Accessory belt replacement (60,000-100,000 miles)
  • Engine mount inspection (100,000+ miles)

Engine Warning Signs You Should Never Ignore

🚨 Oil Pressure Warning — Stop immediately. Low oil pressure can destroy your engine in seconds.

🚨 Engine Overheating — Pull over and let it cool. Overheating can warp heads and crack blocks.

🚨 Flashing Check-Engine Light — Indicates active misfire that can damage catalytic converter.

🚨 Severe Knocking — Internal damage is occurring. Stop driving.

🚨 Heavy Smoke — White, blue, or black smoke indicates serious problems.

🚨 Coolant Loss — Can lead to overheating and engine damage.

🚨 Sudden Loss of Power — Could indicate major failure.

🚨 Unusual Vibration — May indicate mount failure or internal damage.


When Should You Stop Driving?

Stop driving immediately if you experience:

  • Severe overheating — Temperature gauge in red zone
  • Low oil pressure — Oil light on
  • Major coolant leak — Puddles under car
  • Flashing engine warning — Active misfire
  • Loud internal knocking — Bearing failure
  • Severe misfire — Can damage catalytic converter

Continuing to drive with these symptoms can turn a repairable problem into a catastrophic engine failure.


Engine Maintenance Checklist

Print this and keep it handy:

☐ Check engine oil ☐ Check coolant ☐ Inspect belts ☐ Inspect hoses ☐ Check battery ☐ Inspect spark plugs ☐ Replace oil filter ☐ Check air filter ☐ Scan OBD-II ☐ Inspect for leaks


Frequently Asked Questions

How many parts are in a car engine? A modern engine has approximately 200-300 major components, and thousands of individual parts including fasteners, seals, and small components.

What are the main parts of an engine? The main parts are the engine block, cylinder head, pistons, crankshaft, camshafts, valves, timing system, intake system, fuel system, ignition system, exhaust system, lubrication system, and cooling system.

What is the most important engine component? Every component is critical, but the crankshaft, pistons, and cylinder head are often considered most essential for basic operation.

How does a 4-cylinder engine work? Four pistons move up and down in a synchronized pattern, each completing the four-stroke cycle at different times to provide smooth, continuous power.

What does DOHC mean? DOHC stands for Double Overhead Camshaft—an engine design with two camshafts in the cylinder head, one for intake valves and one for exhaust valves.

What causes engine overheating? Common causes include low coolant, failed thermostat, failed water pump, radiator blockage, or head gasket failure.

What causes engine misfires? Misfires are caused by worn spark plugs, failed ignition coils, clogged injectors, vacuum leaks, or low compression.

How long can a car engine last? With proper maintenance, a modern engine can last 200,000-300,000 miles or more.

How often should engine oil be changed? Every 5,000-10,000 miles depending on oil type and driving conditions. Check your owner's manual.

What are the signs of engine failure? Knocking, excessive smoke, loss of power, overheating, low oil pressure, and metal debris in oil.

Can an engine be repaired instead of replaced? Yes, many engine problems can be repaired. However, catastrophic failures may require replacement.

What causes low engine oil pressure? Low oil level, worn oil pump, worn bearings, or a faulty pressure relief valve.


Final Thoughts

Understanding your car's engine components empowers you to:

  • Recognize problems early
  • Communicate effectively with mechanics
  • Perform basic maintenance
  • Make informed repair decisions
  • Extend your engine's life

Your engine is a complex machine, but it's not mysterious. With this knowledge, you're better equipped to keep your car running smoothly for years to come.

Remember: regular maintenance is always cheaper than major repairs. Pay attention to warning signs, address small problems before they become big ones, and your engine will reward you with reliable performance mile after mile.
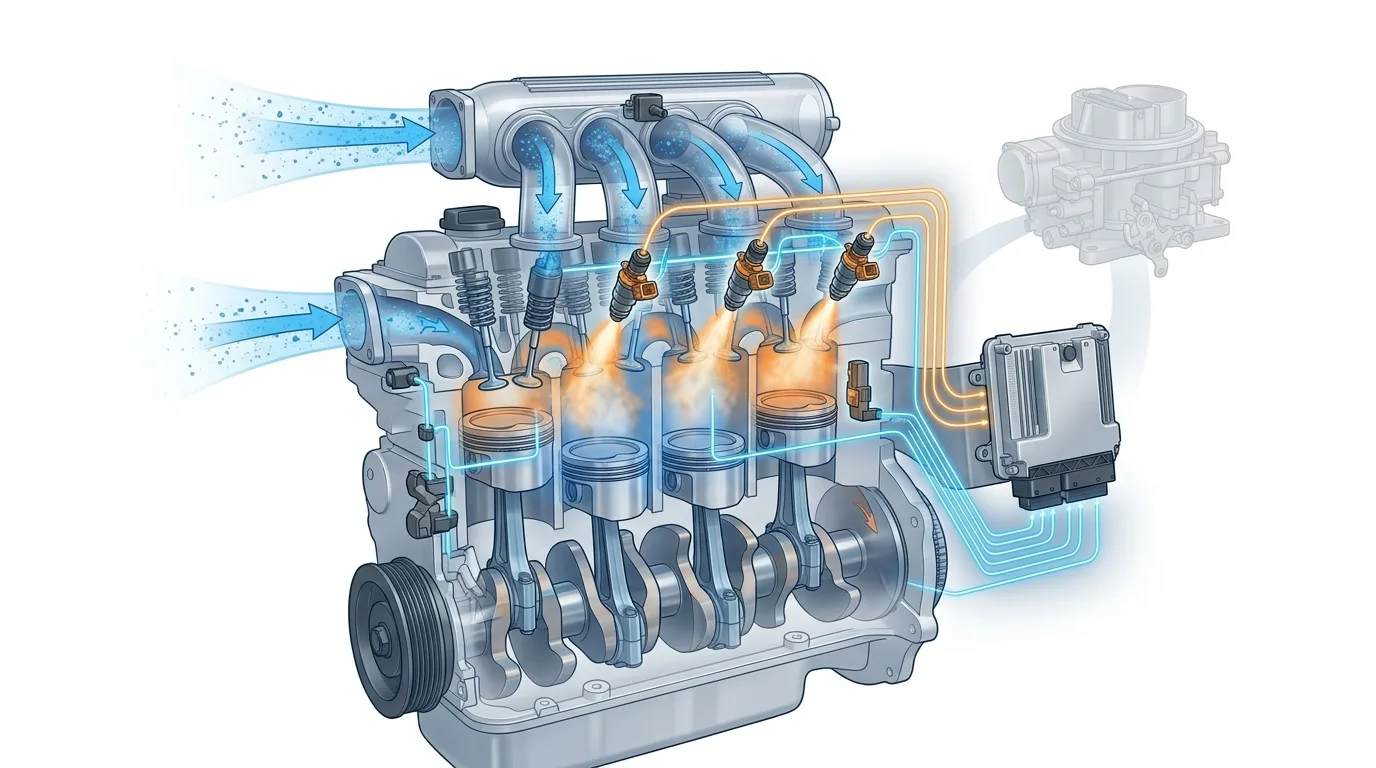
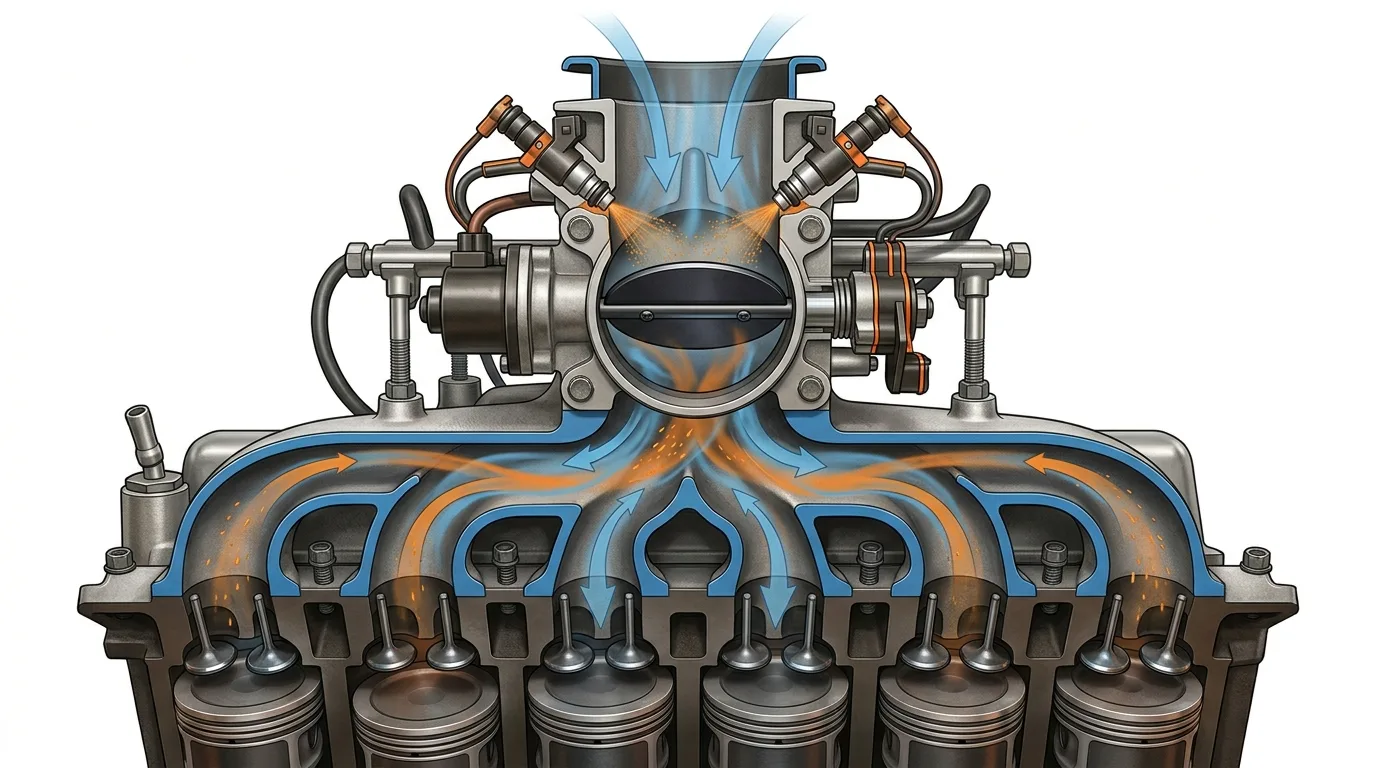
Read the full original


Internal Combustion Engine Vehicle Wiring Harness Explained: A Complete Guide to Power, Control Modules, Fuses and Body Electronics

A modern vehicle depends on much more than an engine and a battery. Behind the dashboard and throughout the engine bay is a complex network of wires, connectors, fuses, relays, control modules and ele...

The Electrical Network Behind Every Modern Car

When people think about a car's electrical system, they often imagine the battery, alternator and a few lights. In reality, a modern internal combustion engine vehicle contains a large electrical network connecting dozens or even hundreds of components.

The wiring harness is what makes this network possible.

It carries electrical power from the battery and charging system to different circuits while also transmitting signals between sensors, switches, motors and electronic control units. Without this network, the engine could not be managed electronically, the lights would not operate correctly, and systems such as windshield wipers, fuel delivery and dashboard displays would not function.

The diagram above provides a simplified visual overview of this architecture. It shows how the engine, body electronics and electrical accessories are connected through a central network of wires, fuses, connectors and control modules.

Let's break it down.


1. What Is a Vehicle Wiring Harness?

A wiring harness is a group of electrical wires bundled together and protected so they can safely connect different parts of a vehicle.

Instead of running hundreds of loose wires throughout the car, manufacturers organize them into sections and branches.

A typical harness can include:

  • Power wires
  • Ground wires
  • Signal wires
  • Connectors
  • Fuse and relay connections
  • Communication lines
  • Branches for individual systems

The harness is designed to survive heat, vibration, moisture and mechanical movement.

In the image, the thick black bundles represent the organized harness sections running between the main electrical components.


2. The Engine: The Electrical and Mechanical Center

At the center of the diagram is the internal combustion engine (ICE).

Although the engine is primarily mechanical, modern engines depend heavily on electronics.

Electrical systems help manage:

  • Fuel injection
  • Ignition
  • Engine sensors
  • Idle control
  • Emissions systems
  • Cooling systems
  • Electronic throttle functions
  • Starting and charging

The engine control unit communicates with many components to determine how the engine should operate under different conditions.

This is why an engine problem can sometimes be caused by an electrical issue rather than a mechanical failure.


3. ECU and ECM: The Vehicle's Electronic Brain

One of the most important components in the diagram is the ECU/ECM, or Engine Control Unit / Engine Control Module.

This computer receives information from sensors and uses programmed logic to control engine functions.

Depending on the vehicle architecture, the ECU can process information such as:

  • Engine speed
  • Coolant temperature
  • Airflow
  • Throttle position
  • Oxygen sensor readings
  • Crankshaft position
  • Camshaft position
  • Vehicle speed

The ECU then sends commands to actuators and other systems.

This continuous exchange of information happens extremely quickly while the vehicle is running.


4. BCM: Controlling the Vehicle Body Electronics

The Body Control Module (BCM) is another major component shown in the diagram.

Unlike the engine ECU, the BCM generally manages body-related electrical functions.

Depending on the vehicle, it may be involved in:

  • Interior lighting
  • Exterior lighting
  • Door locking
  • Windows
  • Wipers
  • Turn signals
  • Central locking
  • Horn control
  • Alarm functions
  • Other convenience features

The BCM helps reduce the amount of direct wiring required between switches and individual components.

For example, pressing a switch does not necessarily send power directly to the final device. The switch may send a signal to the BCM, which then activates the appropriate circuit.


5. Fuse Boxes: Protecting the Electrical System

The fuse boxes shown in the diagram are critical for safety.

A fuse is designed to protect an electrical circuit from excessive current.

If a short circuit or abnormal current condition occurs, the fuse can open the circuit before the wiring becomes dangerously hot.

Typical fuse-box circuits may protect:

  • Lighting
  • Wipers
  • Electronic modules
  • Fuel pump
  • Horns
  • Interior accessories
  • Engine management
  • Power outlets

A blown fuse should never automatically be replaced with a higher-rated fuse. The correct fuse rating is part of the system design.


6. The Ignition or Combination Switch

The ignition or combination switch acts as an important control point for vehicle power.

Depending on the vehicle, turning the ignition switch can establish different electrical states such as:

OFF → ACCESSORY → IGNITION/ON → START

Each position can activate different electrical circuits.

The starting position may energize the starter control circuit while other systems remain powered to support engine operation.

Modern vehicles may use electronic start authorization systems rather than a traditional mechanical ignition switch, but the basic concept of controlled power distribution remains.


7. Instrument Cluster: Information for the Driver

At the top of the diagram is the instrument cluster.

This is the driver's main source of vehicle information.

It can display:

  • Engine speed
  • Vehicle speed
  • Fuel level
  • Warning indicators
  • Temperature
  • Charging status
  • Engine faults
  • Turn indicators
  • Safety alerts

The cluster does not simply receive power and display information. In modern vehicles, it may communicate electronically with other control modules.

This is why a communication problem in one part of the vehicle can sometimes produce unusual dashboard warnings.


8. Alternator: Producing Electrical Power While the Engine Runs

The alternator is responsible for generating electrical energy once the engine is running.

The battery provides the energy needed to start the vehicle, but the alternator supplies electrical power during operation and helps recharge the battery.

The alternator supports systems such as:

  • Engine electronics
  • Lighting
  • HVAC controls
  • Audio systems
  • Body electronics
  • Charging circuits

A charging problem can therefore affect multiple vehicle systems at the same time.


9. Fuel Pump and Fuel Delivery

At the bottom of the diagram is the fuel tank with pump.

The fuel pump is electrically powered and supplies fuel to the engine's fuel delivery system.

The pump circuit usually includes protection and control elements such as:

  • Fuse
  • Relay or electronic switching
  • Wiring
  • Ground
  • Fuel pump assembly
  • ECU or another control module

When the engine control system determines that fuel delivery is required, the pump is activated according to the vehicle's control strategy.

A failure anywhere in this chain can prevent the engine from starting.


10. Windshield Wiper System

The diagram also illustrates the wiper switch and wiper motor.

A typical wiper circuit involves:

Wiper switch → control module/relay → wiper motor → mechanical linkage

The motor converts electrical energy into mechanical movement, which drives the wiper mechanism.

Modern systems may include several operating modes such as:

  • Low speed
  • High speed
  • Intermittent
  • Automatic rain-sensing operation
  • Park position

This is another example of how a relatively simple driver control can involve several electrical and mechanical components.


11. Exterior Lighting and Signaling

The wiring harness also distributes power and control signals to the vehicle's lighting systems.

The image includes examples such as:

  • Headlights
  • Fog lights
  • Daytime running lights
  • Brake lights
  • Rear lights
  • Turn signals

Lighting circuits are often split into multiple branches and protected by dedicated fuses or electronic protection inside a control module.

Modern vehicles can also use separate lighting modules or network-based commands rather than direct switch-to-lamp wiring.


12. Horns and Other Small Electrical Loads

The horn circuit is another good example of a simple but important electrical system.

A horn may be controlled by:

Steering-wheel switch → control module/relay → horn → ground

The control method varies by vehicle, but the principle remains the same: a driver input triggers an electrical circuit that activates an electromagnetic or electronic device.

Other smaller loads can use similar protection and switching strategies.


13. Door and Body Electrical Systems

The wiring harness extends far beyond the engine compartment.

Doors can contain their own electrical components, including:

  • Door lock actuators
  • Window motors
  • Door control modules
  • Courtesy lamps
  • Switches
  • Speakers
  • Sensors

This means the body wiring harness is just as important as the engine wiring harness.

A broken wire inside a door flex area, for example, can cause intermittent electrical problems that are surprisingly difficult to diagnose.


14. Electric Motors Throughout the Vehicle

Several electric motors appear in the diagram.

Depending on vehicle design, motors can be used for:

  • Windows
  • Wipers
  • HVAC functions
  • Seats
  • Mirrors
  • Cooling fans
  • Power accessories

Each motor requires appropriate power, grounding and control.

A motor that fails to operate does not automatically mean the motor itself is defective. The actual problem may be a fuse, relay, wiring issue, bad connector, switch or control module.


15. Why Ground Connections Matter

One of the most overlooked parts of automotive electrical diagnosis is grounding.

Electrical current must have a complete path through the system.

A typical circuit can be simplified as:

Power source → fuse/protection → switch/module → load → ground → power source

A poor ground connection can cause:

  • Dim lights
  • Intermittent electronics
  • Slow motors
  • False sensor readings
  • Module communication problems
  • Starting difficulties

For this reason, technicians often inspect grounding points as carefully as the positive power supply.


16. Connectors: Small Parts With Big Consequences

Connectors may appear insignificant compared with the engine or ECU, but they are essential.

A connector provides a removable electrical connection while keeping multiple circuits organized.

Problems can occur because of:

  • Corrosion
  • Water intrusion
  • Loose terminals
  • Broken locking tabs
  • Poor contact
  • Damaged pins

A single bad terminal can create a difficult intermittent fault.


17. How Electrical Power and Signals Move Through the Vehicle

The entire wiring system can be viewed as several layers.

Power distribution

Electrical energy comes from the battery and alternator and is distributed through protected circuits.

Control

Switches and electronic modules decide when a component should operate.

Communication

Modern vehicles allow electronic modules to exchange information over communication networks.

Load activation

Motors, lamps, solenoids and other devices convert electrical energy into physical action.

Understanding these four layers makes automotive electrical diagnosis much easier.


18. A Practical Example: Why a Headlight May Not Work

Suppose one headlight does not turn on.

A good diagnostic approach is not to immediately replace the bulb.

The technician can check:

Bulb → connector → power supply → fuse/protection → control signal → ground

If power is present but the lamp does not operate, the problem may be at the bulb or ground.

If there is no power, the technician moves upstream through the circuit.

This logical approach is much more effective than replacing parts at random.


19. What This Wiring Diagram Can Teach You

The image is especially useful for beginners because it shows one important idea:

Automotive electrical systems are interconnected networks.

A problem in one section can sometimes affect another section through a shared power supply, ground, fuse, relay, communication network or control module.

That is why automotive electrical diagnosis requires understanding the complete circuit instead of focusing only on the failed component.


20. Final Thoughts

A vehicle wiring harness may look complicated at first, but its purpose is straightforward: it connects the vehicle's electrical and electronic components so they can receive power, communicate and perform their functions.

The engine ECU, BCM, fuse boxes, alternator, fuel pump, lighting, wipers, instrument cluster, switches, motors and connectors all form part of this larger electrical architecture.

Once you understand how power flows, how control modules make decisions and how circuits return to ground, automotive wiring becomes much easier to understand.

For anyone learning automotive electronics, this type of system overview is an excellent starting point before moving on to detailed wiring diagrams, circuit testing and real-world diagnostics.

Read the full original


10 Signs Your Petrol or Diesel Engine Is Starting to Fail

Your engine rarely dies without warning. It whispers first, then talks, then screams. Most drivers only start listening at the screaming stage, which is when the repair bill has already tripled.

Your engine rarely dies without warning. It whispers first, then talks, then screams. Most drivers only start listening at the screaming stage, which is when the repair bill has already tripled.

This article is about catching the whispers. Whether you drive a petrol hatchback or a diesel workhorse, and whether you are inspecting a used car or nursing your own, these ten signs will help you tell the difference between a cheap fix and a terminal diagnosis.

Why most people get this wrong

Engines fail slowly, so the symptoms blend into daily life. A rough idle becomes "just how the car is." A bit of blue smoke becomes "it's an old engine." By the time the dashboard lights up, the damage is done and the cheap repair window has closed.

The second problem is guesswork. People hear a noise, search a forum, and self-diagnose a blown head gasket when the real issue is a $40 sensor. Or the reverse: they ignore a $15 thermostat and cook a cylinder head.

The fix is boring but effective. Learn the early signals, verify them with actual data instead of vibes, and get a second opinion before you authorize a big job. That is the whole game.

1 - A check engine light you keep clearing

You clear the light, it comes back three days later, you clear it again. That is not a fix, it is a countdown timer.

People do this because the car still drives fine and the light is annoying. But a flashing check engine light means active misfire, and unburned fuel is washing your catalytic converter with every revolution.

Don't guess at the code. Run it through a free OBD code lookup, write down the exact number, and read what it actually means before you touch anything. A P0300 and a P0420 point in completely different directions and cost wildly different amounts to fix.

2 - Blue smoke from the exhaust

Blue smoke is oil burning where it shouldn't. On a cold start it might be worn valve stem seals. All the time, especially under acceleration, and you are looking at piston rings or a turbo seal.

The reason people miss it: it's often faint, and you rarely see your own exhaust. Have someone rev the engine while you watch the tailpipe. If you see a blue haze, stop topping up oil and pretending that's normal.

A compression test or leak-down test will tell you whether it's a head job or a full rebuild. That distinction is the difference between hundreds and thousands, so get it checked properly.

3 - Coolant that keeps disappearing with no puddle

You top up the coolant, and a week later the reservoir is low again. No spots on the driveway, no obvious leak. This is one of the most dangerous early signs because it usually means a head gasket or a cracked head.

People ignore it because the car runs fine and the temperature gauge sits normal. But coolant is going somewhere, and if it's entering the combustion chamber, you're one long drive from a warped head.

Look for sweet-smelling white smoke, a milky residue under the oil cap, or bubbles in the coolant reservoir while running. Any of those, stop driving and get it diagnosed. This is not a "monitor it" situation.

4 - A knocking or ticking that follows engine speed

Ticking that speeds up when you rev is often valvetrain, maybe low oil or a failing lifter. A deep knock from the bottom end is far more serious. That's rod bearings, and it's the sound of an engine writing its own obituary.

The mistake is turning up the radio. People convince themselves it's "just a noisy engine" until a rod exits the block on the motorway.

Check your oil level first, right now, before anything else. If the level is fine and the knock is still there, stop driving and get it looked at. Deep knocks don't heal, and the repair cost climbs fast the longer you run it.

5 - Oil that looks like a milkshake

Pull the dipstick and find a creamy, chocolate-milk texture instead of clean oil. That's coolant mixing with oil, and it usually points to a failed head gasket or a cracked block.

People miss it because they only check oil when the warning light comes on, and by then the bearings are already damaged. Coolant destroys oil's ability to lubricate, and metal-on-metal does not take long to ruin an engine.

If you see milkshake oil, do not start the car. Tow it or have it inspected where it sits. This is one of the few signs that genuinely means "stop now."

6 - Rough idle or a shaking steering wheel at stoplights

Your car idles like it's shivering. The whole cabin vibrates at red lights, then smooths out once you're moving. That pattern usually means a misfire, a vacuum leak, or worn engine mounts.

People live with it for months because it's only annoying, not dangerous. Meanwhile the misfire is dumping raw fuel into the exhaust and quietly cooking your catalytic converter. A converter replacement can cost more than the original problem ever would have.

This is where live data earns its keep. Watching misfire counters and fuel trims in real time tells you which cylinder is misbehaving and whether it's ignition or fuel. You can pull that data with a good OBD live-data tool and stop guessing.

7 - Sudden, unexplained oil consumption

Burning a litre of oil every 1,000 km is not normal, even on an older car. If you're topping up between services, something is wearing out: rings, valve guides, or a turbo seal.

The reason this slips past people is that there's no puddle and no smoke they notice, just a dipstick that keeps dropping. Left alone, low oil leads to overheating, bearing wear, and eventually the same knock from sign number four.

Check your oil weekly, not monthly. Keep a note of how much you add and over what distance. That number is the single best clue a mechanic can get, and it tells you whether the wear is mild or advanced.

8 - Power loss and a diesel that smokes under load

Your diesel used to pull hard. Now it feels flat, and there's a black haze behind you on hills. That combination often points to a clogged EGR, a failing turbo, or injector problems.

People accept it as "age" because it happens gradually. But a diesel that's over-fuelling or under-boosting is stressing itself every time you accelerate, and injectors aren't cheap.

On a used-car test drive, this is a red flag worth walking away from unless the price reflects it. Get a mechanic to check boost pressure and injector balance before you commit.

9 - Overheating that comes and goes

The temperature gauge creeps up in traffic, then drops once you're moving. That's usually a cooling fan, a thermostat, or a partially blocked radiator. It is a warning, not a quirk.

People rationalize it because it "fixes itself" once they drive. But every overheating episode warps metal and stresses the head gasket. A $60 thermostat ignored today becomes a $1,500 head job tomorrow.

If the gauge ever heads toward the red, pull over, let it cool, and do not open the cap while hot. Diagnose the cooling system properly before your next long trip.

10 - A hard start, long crank, or rough cold morning

The car cranks for ages before catching, or runs rough for the first minute on cold mornings. On petrol engines this often means fuel pressure or ignition issues. On diesels, glow plugs or injectors.

People brush this off as "cold weather" until one morning it simply won't start at all. By then you're paying for a tow on top of the repair.

Note whether the problem is only cold, only hot, or all the time. That single detail narrows the cause dramatically, and it's the first thing a good mechanic will ask you.

Do this instead

  • Check your oil and coolant weekly, and actually look at what's on the dipstick.
  • Read the code before you clear it. Write the number down and look it up.
  • Watch live data when something feels off, rather than relying on a hunch.
  • Keep a simple log of oil top-ups, odd noises, and when symptoms appear.
  • Get a second opinion before authorizing any repair over a few hundred dollars.
  • When buying used, insist on a pre-purchase inspection. Always.

If you want to go deeper on any single symptom, the step-by-step car guides and the car symptom finder will point you to the right diagnosis path. For the theory behind what you're seeing, the mechanical encyclopedia is a solid reference.

FAQ

Can an engine fail without any warning signs? It's rare, but it happens, usually after a sudden event like an oil pump failure or a snapped timing belt. In most cases, there were earlier signs that went unnoticed. Regular checks catch the quiet ones.

Is a knocking engine always terminal? Not always. A top-end tick from low oil can be fixed cheaply. A deep bottom-end knock is usually serious. The location and pitch of the sound matter, so have someone listen who knows the difference.

How much does it cost to fix a failing engine? It varies wildly. A sensor or thermostat might run $50 to $300 fitted. A head gasket job can run into the thousands, and a full rebuild or replacement engine often costs more than the car is worth. Always get a written estimate before committing.

Should I buy a used car with a check engine light? Only if you know exactly what the code means and the price reflects the repair. Otherwise, walk away. There are plenty of cars without warning lights.

What's the single best early warning sign? Oil consumption. If your engine is quietly using oil, something is wearing. Track it, and you'll usually spot bigger problems before they become expensive.

Keep a small notebook, check your fluids, and read your codes. That habit alone will save you more money than any single repair ever will.

Ready to act on what you just read? Decode that warning light with the free OBD code lookup, run the matching car tools to check the numbers yourself, or browse more practical car articles for ideas.

Read the full original


Petrol vs Diesel: Which Engine Is Cheaper to Maintain?

You are standing in a dealer lot or scrolling through listings, and the same question keeps surfacing: petrol or diesel? The sticker price is only half the story. What you actually pay over five or se...

You are standing in a dealer lot or scrolling through listings, and the same question keeps surfacing: petrol or diesel? The sticker price is only half the story. What you actually pay over five or seven years depends on servicing, parts, fuel, and how the car is driven. That is where the petrol vs diesel maintenance cost debate gets interesting, and where most online arguments go wrong.

The honest answer is that neither engine is universally cheaper. It depends on your annual mileage, whether you do your own work, how long you plan to keep the car, and what kind of driving you do. Let us break down the real criteria: routine servicing cost, repair complexity, longevity, and the safety and emissions systems that come attached to each.

Petrol engines: simpler, cheaper per visit, less to go wrong

A petrol engine is the lower-stress option for most owners. The ignition system is spark plugs and coils, the fuel system runs at lower pressure, and there is no turbocharger on most non-performance models. Fewer parts means fewer things to fail.

Routine servicing is usually cheaper. An oil and filter change on a typical petrol car might run $60 to $120 at an independent shop (estimates vary widely by region and model), and the oil itself is generally less expensive than the low-ash spec diesel engines require. Spark plugs are a periodic cost, but they are cheap and accessible on most four-cylinder engines.

Repairs tend to be more straightforward too. A misfire throws a code, you check the plug and coil, and you are often done. If you want to see how that diagnostic path actually works, the OBD code lookup is a good place to start before you pay anyone.

The downsides: petrol engines generally wear out sooner under heavy load, they are less fuel-efficient, and they produce less torque. If you tow or carry heavy loads regularly, a small petrol engine will work harder and may not last as long as a diesel doing the same job.

Who it suits: low-mileage drivers, city commuters, anyone who wants predictable running costs and does not want to think about particulate filters.

Diesel engines: tougher, thirstier for maintenance, brilliant at distance

Diesel's reputation for longevity is earned, but it comes with strings. The engine itself can outlast a petrol equivalent, often by a wide margin, when it is driven properly. The problem is everything bolted to it.

Modern diesels carry a turbocharger, a high-pressure fuel system, an exhaust gas recirculation (EGR) valve, a diesel particulate filter (DPF), and on many models a selective catalytic reduction system with AdBlue. Each of those is a potential repair bill, and some are expensive.

  • DPF: Designed to burn off soot during longer drives. Short trips clog it. A forced regeneration might cost $150 to $400 at a shop, and a replacement DPF can run well over $1,000 on many models.
  • EGR valve: Clogs with carbon over time. Cleaning is moderate; replacement varies a lot by engine.
  • Injectors: Diesel injectors are precision parts. A set can cost more than $1,500 on some vehicles, sometimes considerably more.
  • Turbo: Usually reliable if oil changes are kept up, but a failure is a four-figure repair.

Diesel oil changes also tend to cost more because of the specification required, and fuel filters need more frequent attention. None of this is a dealbreaker if you drive long distances. It becomes a problem if your daily routine is five-minute trips to the shops.

Who it suits: high-mileage drivers, long commuters, towers, and anyone who regularly gets the engine fully warm.

The driving pattern matters more than the badge

This is the part people skip. A diesel that never reaches operating temperature is a diesel that will punish you. The DPF cannot regenerate on short trips, the EGR clogs faster, and you end up paying for problems a petrol car would never have.

If most of your journeys are under 15 minutes in traffic, a petrol engine is almost always the cheaper and less stressful choice, even if the diesel looks more efficient on paper.

If you cover 15,000 miles a year or more, mostly on highways, the diesel's fuel savings start to outweigh its higher servicing costs. The break-even point depends on fuel prices and the specific cars you are comparing, so run the numbers yourself rather than trusting a rule of thumb.

Where the real costs hide

Routine servicing is only part of the picture. Here is what actually separates the two in the long run:

Diagnostics and complexity. Diesels have more sensors and more emissions hardware, so when something goes wrong, diagnosis takes longer. Labour is billed by time, and that adds up. If you like to understand your own car, exploring the mechanical encyclopedia helps you see what you are dealing with before a shop does.

Parts availability and price. Petrol parts are generally cheaper and more plentiful. Diesel-specific components like high-pressure fuel pumps and injectors are expensive across the board.

Emissions regulations. Older diesels face increasingly strict rules in many cities, which affects resale value and usability. That is a cost, just a delayed one.

Your own skill level. If you do your own maintenance, the gap narrows because labour disappears. Petrol still wins on simplicity, but a well-maintained diesel is not scary to a competent DIY owner. If you want to test where you stand, the mechanic quiz is a quick reality check.

Comparison table

Criterion Petrol Diesel
Routine service cost Lower Higher (oil spec, fuel filter)
Major repair risk Lower Higher (DPF, EGR, injectors, turbo)
Engine longevity Good Often excellent with proper use
Fuel economy Lower Higher
Best for short trips Yes No
Best for high mileage Workable Yes
Torque and towing Limited Strong
Emissions complexity Simpler More complex
DIY friendliness High Moderate

Which one should you choose?

There is no single right answer, so match the engine to your life.

If you are a DIY owner: Petrol is the easier starting point. Fewer specialised tools, simpler diagnostics, cheaper mistakes. A diesel is manageable if you are comfortable with the extra systems, but budget for the possibility of a DPF or injector job.

If you are a daily commuter doing short trips: Petrol. Full stop. You will avoid the DPF and EGR headaches that make diesel ownership miserable in city conditions.

If you are a high-mileage driver: Diesel usually wins on total cost, provided you are doing the miles that keep the emissions systems healthy. The fuel savings and longevity outweigh the higher servicing, but only if you actually drive that way.

If you run a business or tow regularly: Diesel's torque and durability make it the sensible choice, and the maintenance costs are a cost of doing business.

Whatever you pick, staying on top of maintenance is what keeps costs down. Using the OBD live-data tool can help you catch small issues before they become expensive ones, and the step-by-step car guides walk you through common jobs if you want to do more yourself.

FAQ

Is diesel really more expensive to maintain than petrol? Per service, usually yes. Over the life of the car, it depends on mileage. High-mileage drivers often come out ahead despite the higher bills.

How often does a diesel DPF need replacing? There is no fixed interval. It depends on driving style and fuel quality. Many last the life of the car if the vehicle is driven on longer journeys regularly.

Can I do my own diesel servicing? Yes, if you are comfortable with the extra systems and have the right tools. Oil changes and filters are within reach for most home mechanics.

Does a petrol engine last as long as a diesel? Generally not under heavy use, but a well-maintained petrol engine can easily reach high mileage. Driving style and maintenance matter more than the fuel type.

Will emissions rules make my diesel worthless? In some cities, older diesels already face restrictions. Check local rules before buying, especially if you plan to keep the car long-term.

Final takeaway

Petrol is cheaper to maintain per visit and simpler to live with. Diesel costs more to service but can reward high-mileage drivers with longer life and lower fuel bills. The deciding factor is not the engine badge, it is how you drive and how far. Get that right, and the petrol vs diesel maintenance cost question answers itself.

For more practical advice and tools to keep your running costs down, browse the AutoTools blog and the free car tools.

Read the full original


Petrol vs Diesel Engine: Which One Is Really Better in 2026?

Buying a car in 2026 means you cannot dodge the petrol versus diesel question, especially if you are shopping used or looking at a nearly-new car that still has a combustion engine under the hood. Rea...

Buying a car in 2026 means you cannot dodge the petrol versus diesel question, especially if you are shopping used or looking at a nearly-new car that still has a combustion engine under the hood. Read this and you will know how to match the engine to your actual driving, work out what the fuel and running costs really look like, and spot the warning signs that a particular diesel or petrol car is the wrong buy for you. Give it about fifteen minutes.

I am not going to pretend one wins outright. The honest answer depends on your commute, your budget and how long you plan to keep the car. Let's walk through it properly.

What you need before you start

You do not need tools to make this decision, but you do need a few things on hand so your choice is grounded in facts rather than forum gossip.

  • Your real annual mileage. Open your last year of service records or rough it out from your weekly commute. Guessing here is how people end up in the wrong car.
  • A fuel price check. Look up current petrol and diesel prices near you. The gap moves around, so use today's numbers, not last year's.
  • Your insurance quotes for both versions of the car you are considering. Diesel often costs a little more to insure, but verify for your specific model.
  • A phone or notebook for jotting down running-cost numbers as you compare.
  • The owner's manual or a spec sheet for any car you are serious about, so you can check service intervals and any DPF or emissions hardware.

If you are buying used, a diagnostic scan is worth the small fee. You can read fault codes yourself with a cheap reader and the free OBD code lookup to see whether a diesel has stored DPF or EGR faults before you hand over money.

Step 1: Be honest about your mileage and driving pattern

This is the single biggest factor and everything else hangs off it. Diesel engines reward long, steady, fully warmed-up journeys. Petrol engines cope far better with short trips.

Add up your typical week. City commutes under 10 miles, lots of stop-start, engine never really warming up? That is petrol territory. Long motorway runs, towing, or a job that has you covering 15,000 to 20,000 miles a year? Diesel starts to make real sense.

Practical tip: count how many journeys per week are under 5 miles. If most of them are, a modern diesel with a particulate filter will spend its life unhappy, and you will pay for it later.

Step 2: Understand what actually differs, without the marketing

Petrol engines ignite fuel with a spark plug. Diesel engines ignite it with compression alone, which is why they run at higher pressure and usually deliver more torque low down. That torque is why a diesel feels effortless on a hill or when loaded.

Petrol engines are typically smoother, quieter and cheaper to buy. They also rev more freely, which many drivers prefer. Diesel gives you better fuel economy on a steady cruise and stronger pulling power, but the hardware that cleans the exhaust adds complexity.

Neither is "better" in a vacuum. You are really choosing between two characters and two cost profiles.

Step 3: Run the fuel cost numbers for your own mileage

Do not trust a generic calculator. Do this by hand.

Take your annual mileage, divide by the real-world economy figure for the car you want (check owner reports, not just the official number, which tends to flatter both fuel types), then multiply by the current price per gallon or litre. Do it for the petrol version and the diesel version of the same car.

Practical tip: the diesel usually wins on fuel cost once you pass a certain annual mileage, but that crossover point moves with the price gap. When diesel is priced close to petrol, the crossover comes sooner. When diesel is much pricier, it can push the break-even point way out. Run your own numbers with today's prices.

Step 4: Add up the running costs people forget

Fuel is only part of it. Here is what else to weigh.

  • Purchase price. Diesel versions often cost more new and hold a premium used. Check both.
  • Servicing. Diesel service items like fuel filters can cost more, and intervals vary by model. Verify against the manual.
  • Repairs. Modern diesel emissions gear (DPF, EGR, injectors) can be expensive when it fails. This is the big one for short-trip drivers.
  • Insurance and tax. These vary hugely by country and model. Get real quotes and check your local tax rules, which increasingly favour low-emission vehicles.
  • Depreciation. Look at what petrol and diesel versions of your target car actually sell for after three to five years. Trends shift, so check current listings rather than assuming.

If a diesel repair bill would wreck your budget, that tells you something.

Step 5: Check what your local rules will do in the next few years

This matters more in 2026 than it did a decade ago. Many cities now have low-emission or clean-air zones that restrict older diesels, and some charge diesels more to enter or park. Rules differ by country and city, so check your local authority's current guidance before you buy.

A diesel that is cheap today can become a hassle if you regularly drive into a restricted zone. Petrol cars are not automatically exempt either, especially older ones, so check the actual standard your intended car meets.

Step 6: Match the engine to how you will actually use the car

Now pull it together into a decision.

If you mostly do short urban trips, want lower upfront and repair risk, and value smoothness, petrol is usually the smarter buy. If you cover big miles, tow, or spend your life on open roads, diesel's economy and torque often pay off.

If you are genuinely on the fence, look at your last twelve months of driving honestly. The car that fits the driving you actually do beats the car that fits the driving you imagine you do.

Practical tip: for plug-in hybrids and newer mild-hybrid petrols, the petrol versus diesel framing partly changes. If you are considering those, our step-by-step car guides cover how the different powertrains behave in daily use.

Step 7: Inspect before you commit, especially on a diesel

If you are buying used, a pre-purchase inspection is money well spent, and it is non-negotiable on a diesel with emissions hardware.

Ask for the service history and look for evidence of DPF or EGR work. A car that has had repeated emissions faults is telling you how it was driven. Scan it for stored codes, and if you want to watch live sensor behaviour during a test drive, the OBD live-data tool helps you see what the engine is doing in real time rather than guessing.

Safety note: never crawl under a car you are inspecting unless it is properly supported on stands on level ground, and never touch exhaust or coolant components until the engine is cold. Hot fluids and hot metal cause serious burns.

Step 8: Get a second opinion on the specific car

A generic answer about petrol versus diesel gets you to the right category. It does not tell you whether that particular diesel has a healthy DPF or whether that petrol has a timing chain issue. For model-specific weak points, the mechanical encyclopedia and our car symptom finder can point you toward what to check.

If a fault code comes up during your inspection, cross-check it before you panic. Plenty of codes are cheap fixes and plenty are not, and knowing which is which changes your negotiating position.

Pro tips

  • Drive both versions of the same car back to back if you can. The torque difference is obvious on the road and easy to miss on paper.
  • Do the break-even math with a pessimistic economy figure for the diesel. If it still wins, you have a real case.
  • On a used diesel, ask the seller how often they did long journeys. Frequent short trips are a red flag for the emissions system.
  • Budget for one unexpected repair in your first year, whichever fuel you pick. It keeps the decision honest.
  • If your mileage is borderline, lean petrol. It is more forgiving of a change in routine, and routines do change.
  • Check insurance and tax for both versions before you fall in love with a car. The wrong one can add a surprising amount to your yearly costs.

Common pitfalls

  • Buying a diesel for the economy when your driving is all short trips. You will likely spend the savings on emissions repairs. Match the engine to the driving, not the sticker.
  • Trusting the official economy figure. Real-world numbers differ, sometimes a lot. Use owner-reported figures.
  • Ignoring local clean-air rules. A cheap diesel can be an expensive mistake if you drive into a restricted zone.
  • Skipping the inspection to save a small fee. A missed fault can cost many times more than the inspection.
  • Assuming diesel always means cheaper running costs. Once you add servicing, repairs and insurance, that is often not true at low mileage.

Useful resources

FAQ

Is diesel still worth it in 2026?

For high-mileage, long-journey drivers, often yes. For short-trip city drivers, usually no. The deciding factor is your driving, not the year.

Is diesel more expensive to maintain than petrol?

Generally the service items and emissions repairs can cost more, but it varies by model. Check the specific car's service schedule and known weak points.

Can I do lots of short trips in a diesel?

You can, but it is hard on the particulate filter and can lead to costly problems. If short trips are your normal, petrol is the safer choice.

Does diesel give better fuel economy?

On a steady cruise, usually yes. In stop-start city driving, the advantage shrinks or disappears, and the repair risk grows.

How do I check a used diesel before buying?

Get a pre-purchase inspection, review the service history for emissions work, and scan for stored fault codes. Decode anything suspicious before you commit.

Final word

There is no universal winner here, and anyone who tells you otherwise is selling something. Work out your real mileage, run your own numbers, check your local rules, and inspect the actual car. Do those four things and you will pick the engine that fits your life, not the one a brochure told you to want.

Read the full original


Fundamentals

How a vehicle is built

The vocabulary and architecture of the modern car: engine, drivetrain and the systems every other level builds on.

Read the full original


How to Choose the Right Engine Oil for Your Car

Engine oil protects moving parts, carries heat away, and helps keep your engine clean. Choosing the wrong oil can increase wear, reduce fuel economy, or damage emissions equipment. The good news is th...

Introduction

Engine oil protects moving parts, carries heat away, and helps keep your engine clean. Choosing the wrong oil can increase wear, reduce fuel economy, or damage emissions equipment. The good news is that the right choice is usually printed in your owner's manual, and matching those specs matters more than brand loyalty or price.

Start With the Owner's Manual

Your manual lists the required viscosity grade and the industry specification the oil must meet. Follow it exactly, especially if your car is under warranty.

  • Look for a grade like 0W-20, 5W-30, or 10W-40.
  • Note any required standard, such as API SP or an OEM approval.
  • Check whether the manual allows conventional, synthetic blend, or full synthetic oil.

Understand Viscosity Grades

The number before the W describes cold flow, and the number after it describes thickness at operating temperature. A lower winter number flows faster on cold starts.

  • Use the grade the manufacturer specifies, not a thicker one "for protection."
  • Newer engines often use low-viscosity oils to meet fuel economy targets.
  • Older, high-mileage engines may tolerate a slightly thicker grade, but only if the manual permits it.

Conventional, Synthetic Blend, or Full Synthetic

Full synthetic oils resist heat and breakdown better and flow well in cold weather. Many modern engines require them.

  • Turbocharged or direct-injection engines usually need full synthetic.
  • Synthetic blends cost less and suit some older designs.
  • Conventional oil is fine only where the manual allows it.

Check the API or OEM Rating

The rating on the bottle confirms the oil meets current performance tests. Buy oil that matches or exceeds the manual's requirement.

  • API SP covers modern engines and protects timing chains and turbochargers.
  • OEM approvals, such as dexos or specific European standards, may be mandatory.
  • Never mix ratings to save money on a car under warranty.

Read the full original


How a Diesel Engine Works: A Complete Guide for Beginners

Diesel engines power everything from passenger cars to heavy trucks, and their reputation for torque and durability comes from a simple but robust design. Instead of mixing fuel and air before ignitio...

Introduction

Diesel engines power everything from passenger cars to heavy trucks, and their reputation for torque and durability comes from a simple but robust design. Instead of mixing fuel and air before ignition, a diesel draws in air, squeezes it until it gets hot, then injects fuel directly into that hot air. The fuel ignites on contact, so there is no spark plug and no throttle plate on most designs. Understanding this cycle helps you diagnose hard starts, smoke, and power complaints with more confidence.

The Four Strokes

A diesel follows the same four-stroke sequence as a gasoline engine, but the events differ in key ways.

  • Intake: the piston moves down and pulls in fresh air only.
  • Compression: the piston rises and compresses that air to a very high ratio, often 16:1 to 23:1.
  • Power: the injector sprays fuel into the superheated air, and combustion drives the piston down.
  • Exhaust: the piston rises and pushes burned gases out.

Compression Ignition

Compressing air raises its temperature dramatically, which is why diesel needs no spark. The injector must atomize fuel finely and time the spray precisely. If compression is low from worn rings or valves, the air may not get hot enough, and you get white smoke, misfires, or a no-start. Glow plugs help only on cold starts; they do not run the engine once it is warm.

Fuel and Air Management

Diesel power is controlled by fuel quantity, not by restricting air. That is why a diesel can run lean and why a runaway can occur if it burns its own oil.

  • The injection pump or common rail builds and times pressure.
  • The turbocharger packs in more air for more power.
  • The EGR and DPF systems handle emissions and soot.

Service and Safety

Diesel fuel systems are sensitive to contamination and to extremely high injection pressures. Never crack a high pressure line with the engine running. Always verify torque values and fluid specs in the vehicle manual, and use the correct oil rating for engines with aftertreatment.

Read the full original


How a Gasoline Engine Works: A Complete Beginner’s Guide

A gasoline engine turns chemical energy into motion through a repeating cycle of intake, compression, power, and exhaust. For a working mechanic, the value is not the theory itself but how each stroke...

Introduction

A gasoline engine turns chemical energy into motion through a repeating cycle of intake, compression, power, and exhaust. For a working mechanic, the value is not the theory itself but how each stroke explains the faults you diagnose daily: a misfire, a no-start, a knock, or a rich exhaust. This guide covers the four-stroke cycle, the main systems that support it, and the checks that follow from understanding it.

The Four-Stroke Cycle

Most gasoline engines run a four-stroke cycle, with the piston moving down and up twice per power event.

  • Intake: the piston moves down, the intake valve opens, and the descending piston draws in air and fuel.
  • Compression: both valves close and the piston rises, squeezing the charge. Compression ratio is fixed by the piston and chamber geometry.
  • Power: the spark plug fires near top dead center, and expanding gases drive the piston down.
  • Exhaust: the exhaust valve opens and the rising piston pushes out burned gases.

Fuel and Ignition Systems

The engine needs the right air and fuel ratio and a spark at the right moment.

  • Port or direct injection delivers fuel; direct injection runs higher pressure and is more sensitive to injector condition.
  • The ignition coil fires the plug. Weak spark, fouled plugs, or a bad coil show up as misfires, often with a specific cylinder code.
  • The ECU adjusts timing and fuel from sensor data, so a faulty mass airflow or oxygen sensor can mimic a mechanical fault.

Air, Cooling, and Lubrication

These support systems keep the cycle stable and the engine alive.

  • Air filter restriction reduces airflow and can cause rich running.
  • Coolant flow controls temperature; overheating can warp heads and damage gaskets.
  • Oil pressure protects bearings and the valvetrain. Low pressure is a stop-now condition, not a monitor-and-see.

What This Means in the Bay

Use the cycle to guide diagnosis rather than guesswork.

  • A dead cylinder points to spark, fuel, or compression. Test all three before condemning parts.
  • A knock under load can be timing, fuel quality, or carbon buildup.
  • Always verify torque values and fluid specs in the vehicle manual before reassembly or a fill.

Read the full original


Gasoline Fuel Injection Systems Explained: The No-BS Guide to MPI, GDI, PFI, and Everything In Between

Confused by MPI, GDI, PFI, and dual injection? You’re not alone. no-BS guide breaks down every gasoline fuel injection system in plain English how they work, where they spray, and which one is best fo...

Your engine is basically an air pump that loves to burn things. Fuel injection is how it decides exactly how much gasoline to throw into the fire.

enter image description here

Get that wrong, and you get rough idles, terrible fuel economy, misfires, check-engine lights, and sometimes a repair bill that makes you question your life choices.

But here’s the good news: fuel injection isn’t some black magic. Once you understand the main types — single-point, multi-point, port, direct, and dual injection — the whole thing starts to make sense.

So let’s break it down like a human, not a textbook.


The 20-Second Version

A gasoline engine needs air and fuel mixed in the right ratio. Too much fuel, and you’re wasting gas and making pollution. Too little fuel, and you risk misfires, heat, and engine damage.

Carburetors used to handle this with vacuum, needles, jets, and guesswork. Fuel injection does it with sensors, a computer, and electrically controlled injectors.

The computer — usually called the ECU — looks at how much air is coming in, how hot the engine is, how hard you’re pressing the gas, and what the exhaust oxygen sensor says. Then it opens the injectors for a precise amount of time.

That’s it. That’s fuel injection.

Everything else is just variations on where the fuel gets sprayed and how many injectors do the job.


Don’t Get Confused by the Labels

Before we go further, burn this into your brain:

  • Single-point vs. multi-point = how many injectors and where they sit.
  • Direct vs. indirect = where the fuel is injected.
  • Sequential, batch-fire, simultaneous = when the injectors fire.
  • EFI = electronic fuel injection, meaning a computer controls it.

These categories overlap. A car can have multi-point, port, sequential, electronic fuel injection. That’s not a contradiction. It’s just four different ways to describe the same system.

Now let’s go through the main types.


1. Single-Point Fuel Injection (SPI / TBI)

Also called throttle-body injection, or TBI.

enter image description here

Imagine a carburetor, but instead of jets and floats, you have one or two fuel injectors sitting above the throttle plate. The fuel sprays into the incoming air, then the mixture gets pulled into the intake manifold and distributed to the cylinders.

It was a huge step up from carburetors in the 1980s and early 1990s. It was simpler, more reliable, and could adjust fuel delivery based on sensor feedback.

But it had problems.

Because the fuel has to travel through the whole intake manifold, some cylinders get a richer mix and some get leaner. Cold starts aren’t great. Performance is modest. And emissions aren’t as clean as modern systems.

Pros: cheap, simple, better than a carburetor.
Cons: uneven fuel distribution, weak cold-start behavior, limited precision.
Typical use: older economy cars, trucks, and engines from the 1980s and early 1990s.

If you own a classic fuel-injected car from that era, there’s a good chance it’s TBI.


2. Multi-Point Fuel Injection (MPFI / MPI)

This is the system most people grew up with. One injector per cylinder, mounted in the intake port just before the intake valve.

enter image description here

Instead of one central injector trying to feed everybody, each cylinder gets its own fuel delivery. That means better fuel distribution, better throttle response, and cleaner emissions.

There are a few timing strategies:

  • Sequential injection: each injector fires right before its cylinder’s intake valve opens. Best control and efficiency.
  • Batch-fire injection: injectors fire in groups. Simpler and cheaper.
  • Simultaneous injection: all injectors fire at once. Old-school and less precise.

Most modern port-injection engines use sequential injection.

Pros: excellent reliability, good fuel economy, cheaper to repair than direct injection, fuel washes intake valves.
Cons: less precise than direct injection, some fuel can condense on port walls, lower efficiency potential.
Typical use: millions of cars from the 1990s, 2000s, and even today.

If you’ve ever replaced a fuel injector on a Honda, Toyota, or Ford from the 2000s, you’ve met MPFI.


3. Direct Injection (GDI / FSI / DISI)

This is where things get spicy.

enter image description here

Gasoline direct injection puts the injector directly inside the combustion chamber. Instead of mixing fuel with air in the intake port, it sprays gasoline right into the cylinder.

That requires a high-pressure fuel pump, usually driven by the camshaft, and injectors built to survive extreme pressure and heat. We’re talking hundreds to a few thousand psi.

Direct injection allows two main strategies:

  • Homogeneous charge: fuel and air are mixed evenly throughout the cylinder, like a normal engine.
  • Stratified charge: a richer pocket of fuel forms near the spark plug, while the rest of the cylinder is lean. This can improve efficiency at light loads.

Pros: more power, better fuel economy, precise fuel control, cooling effect in the cylinder, ideal for turbocharged engines.
Cons: carbon buildup on intake valves, expensive high-pressure parts, complex diagnostics, and sometimes low-speed pre-ignition in turbo engines.
Typical use: modern turbocharged and naturally aspirated engines from Toyota, Honda, Ford, GM, BMW, Mercedes, Hyundai, Kia, and many more.

The big downside? Because fuel no longer washes over the intake valves, carbon deposits can build up over time. That’s why some GDI engines need walnut blasting.

Yes, walnut blasting. Tiny crushed walnut shells. It’s a real thing.


4. Indirect Injection in Gasoline Engines

“Indirect injection” just means the fuel is injected somewhere outside the combustion chamber.

enter image description here

That includes both throttle-body injection and port fuel injection. So yes, most multi-point systems are indirect.

In a port-injection setup, fuel mixes with air in the intake port before the intake valve opens. By the time the air-fuel mixture enters the cylinder, it’s already reasonably well mixed.

This is different from diesel indirect injection, which uses a prechamber or swirl chamber. Gasoline indirect injection is usually just port or throttle-body injection. Diesel indirect injection is a whole different animal because diesel relies on compression ignition, not a spark plug.

Pros: simpler, cheaper, cleaner intake valves, easy to diagnose.
Cons: less efficient than direct injection, lower compression tolerance, less precise fuel control.
Typical use: still common on many non-turbo engines and older vehicles.


5. Dual Injection (Port + Direct)

If port injection is reliable and direct injection is efficient, why not both?

enter image description here

That’s exactly what dual injection does. It uses two injectors per cylinder: one port injector and one direct injector. The ECU decides which one to use — or both — depending on the situation.

At cold start, the port injectors can handle fuel delivery and help clean the intake valves. Under heavy load or high efficiency demands, the direct injectors take over. Sometimes both work together.

Pros: best of both worlds, reduced carbon buildup, better cold-start emissions, improved fuel economy and power.
Cons: more complexity, more parts, higher repair costs.
Typical use: Toyota D-4S, some Lexus, Volkswagen/Audi, and other premium modern engines.

It’s basically the belt-and-suspenders approach to fuel injection.


How Electronic Fuel Injection (EFI) Actually Works

The ECU is the brain. It reads a bunch of sensors:

enter image description here

  • Mass airflow sensor (MAF): how much air is entering.
  • Manifold absolute pressure sensor (MAP): intake manifold pressure.
  • Throttle position sensor (TPS): how far you’re pressing the gas.
  • Oxygen sensor: how much oxygen is left in the exhaust.
  • Engine coolant temperature sensor: how warm the engine is.
  • Crankshaft and camshaft position sensors: engine speed and timing.

Then it calculates how much fuel to inject. The injectors open for a specific “pulse width,” measured in milliseconds.

In open-loop mode, the ECU uses preset maps and ignores the oxygen sensor. This happens during cold starts and wide-open throttle.

In closed-loop mode, the ECU uses oxygen sensor feedback to fine-tune fuel delivery. This is how it keeps the air-fuel ratio close to ideal during normal driving.

When something is off, the ECU adjusts fuel trims. Positive fuel trims mean it’s adding fuel. Negative fuel trims mean it’s pulling fuel. If the trims get too far out of whack, you get a check-engine light.


Air-Fuel Ratio: The Magic Number Isn’t Always Magic

For pure gasoline, the stoichiometric ratio is about 14.7:1 by mass. That means 14.7 parts air to 1 part fuel.

enter image description here

But real-world driving isn’t always stoichiometric.

  • Cold start: richer mixture.
  • Acceleration: richer mixture for power and cooling.
  • Cruising: close to stoichiometric or slightly lean.
  • High load: richer mixture to protect the engine.
  • Light load: possibly lean or stratified in a GDI engine.

Lambda is another way to express it. Lambda 1.0 equals stoichiometric. Less than 1.0 is rich. Greater than 1.0 is lean.

Get the mixture wrong, and you’ll feel it. Too rich: black smoke, fouled plugs, poor economy. Too lean: hesitation, misfires, high temperatures, and potential engine damage.


Quick Comparison Table

enter image description here

System Where Fuel Is Injected Injectors Pressure Pros Cons Typical Use
Single-point / TBI Throttle body 1–2 Low Simple, cheap Uneven distribution, weak cold start Old 80s/90s engines
Multi-point / MPFI Intake ports One per cylinder Moderate Reliable, good economy, cheap to fix Less precise than GDI Most 90s–2000s cars
Sequential MPFI Intake ports One per cylinder, timed Moderate Best port-injection control Still indirect Modern non-turbo engines
Direct Injection / GDI Combustion chamber One per cylinder High Power, efficiency, precise Carbon buildup, expensive Modern turbo and NA engines
Dual Injection Port + combustion chamber Two per cylinder Both Best compromise Complex, costly Premium modern engines

Common Fuel Injection Problems

Fuel injectors are tough, but they’re not invincible.

enter image description here

Watch for:

  • Hard starting — weak fuel pump, low pressure, leaking injector, bad sensor.
  • Rough idle — clogged injector, vacuum leak, ignition problem.
  • Poor fuel economy — dirty MAF, lazy oxygen sensor, leaking injector.
  • Loss of power — clogged fuel filter, weak pump, restricted injector.
  • Misfires — injector fault, spark plug, coil, compression issue.
  • Black smoke — rich mixture, leaking injector, bad fuel pressure regulator.
  • Check Engine Light — codes like P0171, P0174, P0300, P0301.

enter image description here

Don’t just throw parts at it. Scan the codes, check fuel trims, test fuel pressure, and inspect the injectors.


Fuel Injection Maintenance: What Actually Matters

There’s no universal “clean your injectors every 30,000 miles” rule. It depends on your engine, fuel quality, and driving conditions.

enter image description here

What you should do:

  • Follow the owner’s manual.
  • Use Top Tier detergent gasoline.
  • Replace the fuel filter when recommended.
  • Fix check-engine lights early.
  • Consider professional injector cleaning if you have symptoms.
  • For GDI engines, be aware of intake valve carbon buildup.
  • Check fuel pressure and fuel trims with an OBD-II scanner.

Safety first: fuel is flammable and systems can stay pressurized. Relieve pressure, disconnect the battery, work in a ventilated area, and never smoke around fuel.


Fuel Injection vs. Carburetor

Carburetors are simple and nostalgic. Fuel injection is precise and smart.

enter image description here

Category Carburetor Fuel Injection
Fuel metering Mechanical, imprecise Electronic, precise
Air-fuel control Limited Real-time adjustment
Cold start Choke, often rough Automatic and smooth
Fuel economy Worse Better
Emissions Higher Lower
Altitude compensation Poor Automatic
Reliability Simple but needs tuning Complex but consistent
Repair cost Cheap parts, frequent tuning Higher parts, less frequent tuning

That’s why electronic fuel injection won. It’s cleaner, more efficient, more powerful, and more reliable in daily driving.


Which Gasoline Injection System Is Best?

There’s no single winner.

enter image description here

  • Port injection is great for reliability, low maintenance, and older vehicles.
  • Direct injection is great for efficiency, power, and turbocharging.
  • Dual injection is the best of both worlds, but it costs more.
  • Single-point injection is outdated but simple.

If you want a cheap, dependable commuter, port injection is fantastic. If you want maximum efficiency and performance, direct injection is the way. If you want the best of both and you’re willing to pay for it, dual injection is the premium answer.

The “best” system depends on the engine’s design, your budget, and how you drive.


The Future of Gasoline Fuel Injection

Fuel injection isn’t standing still.

enter image description here

Expect to see:

  • Higher-pressure direct injection.
  • More advanced dual-injection strategies.
  • Better turbocharged, downsized engines.
  • Improved combustion control.
  • Tighter emissions regulations.
  • More integration with hybrid powertrains.
  • Continued development of gasoline engine efficiency.

Even as electric cars grow, gasoline engines will keep getting smarter. Fuel injection is a huge part of that.


FAQ

enter image description here

What are the main types of gasoline fuel injection?

Single-point, multi-point, port, direct, and dual injection. Port and throttle-body are indirect. Direct sprays into the cylinder. Dual uses both.

What’s the difference between single-point and multi-point injection?

Single-point uses one or two injectors in the throttle body. Multi-point uses one injector per cylinder in the intake ports.

Is direct injection better than port injection?

For efficiency and power, often yes. For simplicity and lower maintenance, port injection can be better. Direct injection can suffer from carbon buildup on intake valves.

What do SPI, MPI, MPFI, and GDI mean?

SPI: single-point injection. MPI/MPFI: multi-point fuel injection. GDI: gasoline direct injection. They describe different layouts and injection locations.

Can a gasoline engine use both direct and indirect injection?

Yes. That’s dual injection. It uses port and direct injectors together.

Does direct injection consume less fuel?

It can improve efficiency, but real-world fuel economy depends on the engine, tuning, gearing, weight, and how you drive.

What are the symptoms of a faulty fuel injector?

Rough idle, misfires, hard starting, fuel smell, poor economy, loss of power, and check-engine lights.

How often should gasoline injectors be cleaned?

There’s no universal interval. Follow your owner’s manual and address symptoms when they appear.

What is the ideal air-fuel ratio for a gasoline engine?

About 14.7:1 for pure gasoline at stoichiometric. Real-world conditions change the required mixture.

Can a fuel injection system cause the Check Engine Light to turn on?

Absolutely. Injector faults, sensor issues, fuel pressure problems, and mixture errors can all trigger it.


The Bottom Line

Gasoline fuel injection isn’t one thing. It’s a family of systems that all do the same basic job: mix air and fuel as precisely as possible.

Single-point was the first big step. Multi-point made it better. Direct injection made it sharper. Dual injection combined the strengths of both.

If you understand your system, you can diagnose problems faster, maintain it better, and avoid getting ripped off at the repair shop.

And honestly? That’s a superpower every car owner should have.

Read the full original


Files & links

Audio

كيف_تفرض_كيمياء_الوقود_تصميم_المحركات
0:00 / 0:00
فيزياء_قطرات_السوائل_بين_المحرك_والغسالة
0:00 / 0:00
Advertisement
Advertisement
Install AutoToolsWorks offline, one tap away.
Ad
Ask the AI mechanic
Hi! Ask me anything about your car — codes, noises, parts, maintenance.
All tools